本文为看雪论坛优秀文章
看雪论坛作者ID:Tangdouren
一
去混淆思路

图 1-1 混淆代码
如果条件跳转指令不执行,将cmp/test +条件跳转指令替换成NOP指令。
如果条件跳转指令执行,将cmp/test到跳转地址之间的指令替换成NOP指令。
二
代码结构
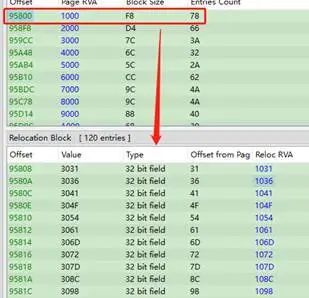
2.1 获取重定位表中存储的需要修正的代码地址

图 2-1 重定位表
reloc_table_num = pefile.DIRECTORY_ENTRY['IMAGE_DIRECTORY_ENTRY_BASERELOC']# 获取重定位表的VirtualAddress和Sizereloc_table = pe.OPTIONAL_HEADER.DATA_DIRECTORY[reloc_table_num]reloc_table_rva = reloc_table.VirtualAddressreloc_table_size = reloc_table.Sizeprint(f'重定位表RAV:{reloc_table_rva:#x},重定位表大小:{reloc_table_size:#x}')


relocations = pe.parse_relocations_directory(reloc_table_rva, reloc_table_size)reloc_data_rva = []for i in relocations:for j in i.entries:# print(f'重定位数据RVA:{j.rva:#x}')reloc_data_rva.append(j.rva)
class BaseRelocationData(DataContainer):"""Holds base relocation information.struct: IMAGE_BASE_RELOCATION structureentries: list of relocation data (RelocationData instances)"""class RelocationData(DataContainer):"""Holds relocation information.type: Type of relocationThe type string can be obtained byRELOCATION_TYPE[type]rva: RVA of the relocation"""

图 2-2 BaseRelocationData的struct和RelocationData对象列表

图 2-3 重定位数据的RVA
2.2 获取混淆指令所在地址


图 2-4 混淆指令
branch = ["JZ", "JP", "JO", "JS", "JG", "JB", "JA", "JL", "JE", "JNZ", "JNP", "JNO", "JNS", "JLE", "JNB", "JBE","JGE", "JNE", "JAE"]b = 3for i in range(3):code = memory_data[reloc_data_rva - b: reloc_data_rva - b + 40]if b == 3 and code[0] != 0x66:b = b - 1continueb = b - 1try:ins = md.disasm(code, ImageBase + reloc_data_rva-b-1)ins_1 = next(ins)ins_2 = next(ins)ins.close()except StopIteration:continueif (ins_1.mnemonic == 'cmp' or ins_1.mnemonic == 'test') and ins_2.mnemonic.upper() in branchand len(ins_1.operands) == 2 and ins_1.operands[0].type == X86_OP_MEM and ins_1.operands[1].type == X86_OP_IMM:return return ins_1.address-0x10000000return 0
2.3 模拟执行混淆指令
2.3.1 将文件映射到内存中

图 2-5 对齐值

图 2-6 文件映射到内存中的地址
pe = pefile.PE(filename, fast_load=True)content = pe.get_memory_mapped_image()mu.mem_write(0x10000000, pe.get_memory_mapped_image())
2.3.2 定义hook_code函数
instruction_3 = []def hook_code(mu, address, size, userdata):print(f'>>> Tracing instruction at {address:#x}, instruction size = {size:#x}')r_esp = mu.reg_read(UC_X86_REG_ESP)count = u32(mu.mem_read(r_esp + 4, 4))print(f'count is {count}')if count == 2:instruction_3.append(address)mu.emu_stop()try:exit()except BaseException as e:print(e)count = count + 1mu.mem_write(r_esp + 4, p32(count))def simulate_execute(ins_addr_rva):mu.mem_write(r_esp + 4, p32(0))mu.emu_start(ins_addr_rva + ImageBase, 0x100066E6)
2.3.3 调用函数获取跳转结果
reloc_data_rva = get_reloc_data_rva(pe)for rva in reloc_data_rva:ins_addr_rva = get_intruction_start_rva(memory_mapped_image, rva, ImageBase)if ins_addr_rva != 0:simulate_execute(ins_addr_rva)
2.4 根据是否跳转执行替换相应指令
# 获取按顺序执行时第3条指令地址code = memory_mapped_image[ins_addr_rva:ins_addr_rva+40]ins = md.disasm(code, ImageBase + ins_addr_rva)ins_1 = next(ins)ins_2 = next(ins)try:ins_3 = next(ins)ins_3_address = ins_3.addressexcept:ins_3_address = 0ins.close()
if instruction_3[count] == ins_3_address:size = ins_1.size + ins_2.sizeassembly = b'x90' * sizeImageBase, ImageBase + ins_addr_rva, assembly)else:size = instruction_3[count] - ins_1.addressassembly = b'x90' * sizeImageBase, ImageBase + ins_addr_rva, assembly)count = count + 1
2.5 修复文件
for section in pe.sections:print(f'{section.Name}, VirtualAddress: {section.VirtualAddress:#x}, 'f'Size: {section.SizeOfRawData:#x}, 文件偏移: {section.PointerToRawData:#x}')pe.set_bytes_at_rva(section.VirtualAddress,bytes(memory_mapped_image[section.VirtualAddress:section.VirtualAddress + section.SizeOfRawData]))print('[+] Save to file ' + '1.bin')pe.write('1.bin')
三
完整代码
# _*_ coding: utf-8 _*_import pefileimport structfrom capstone.x86 import *from capstone import *from unicorn import *from unicorn.x86_const import *from binascii import *def u32(data):return struct.unpack("I", data)[0]def p32(num):return struct.pack("I", num)def patch(image, image_base, address, patch_data):''':param image: memory_mapped_image 从入口点开始处的数据:param image_base: 基址:param address: imagebase+rva VA:param patch_data::return:'''i = 0for b in patch_data:image[address - image_base + i] = bi += 1# 获取重定位表的序号 pefile.py 146行def get_reloc_data_rva(pefile_struct):''':param pefile_struct::return: 返回所有重定位数据的RVA列表'''reloc_table_num = pefile.DIRECTORY_ENTRY['IMAGE_DIRECTORY_ENTRY_BASERELOC']# 获取重定位表的VirtualAddress和Sizereloc_table = pe.OPTIONAL_HEADER.DATA_DIRECTORY[reloc_table_num]reloc_table_rva = reloc_table.VirtualAddressreloc_table_size = reloc_table.Sizeprint(f'重定位表RAV:{reloc_table_rva:#x},重定位表大小:{reloc_table_size:#x}')# reloc_table由数个IMAGE_BASE_RELOCATION结构组成,每个结构由VirutalAddress(DWORD)、SizeOfBlock(DWORD)和TypeOffset(SizeOfBlock-8)组成# parse_relocations_directory返回BaseRelocationData对象列表relocations = pe.parse_relocations_directory(reloc_table_rva, reloc_table_size)# 获取所有的重定位数据RVAreloc_data_rva = []for i in relocations:# BaseRelocationData有两个属性,struct和entries。# struct是IMAGE_BASE_RELOCATION结构的VA和Size。# entries: list of relocation data (RelocationData instances)# RelocationData: type和RVA# print(i.struct)for j in i.entries:reloc_data_rva.append(j.rva)return reloc_data_rvadef get_intruction_start_rva(memory_data, reloc_data_rva, ImageBase):''':param memory_data: 映射到内存中的文件数据:param reloc_data_rva: 重定位数据的rva:param ImageBase: ImageBase:return: 指令的rva'''branch = ["JZ", "JP", "JO", "JS", "JG", "JB", "JA", "JL", "JE", "JNZ", "JNP", "JNO", "JNS", "JLE", "JNB", "JBE","JGE", "JNE", "JAE"]b = 3for i in range(3):code = memory_data[reloc_data_rva - b: reloc_data_rva - b + 40]if b == 3 and code[0] != 0x66:b = b - 1continueb = b - 1try:ins = md.disasm(code, ImageBase + reloc_data_rva-b-1)ins_1 = next(ins)ins_2 = next(ins)ins.close()except StopIteration:continueif (ins_1.mnemonic == 'cmp' or ins_1.mnemonic == 'test') and ins_2.mnemonic.upper() in branchand len(ins_1.operands) == 2 and ins_1.operands[0].type == X86_OP_MEM and ins_1.operands[1].type == X86_OP_IMM:return ins_1.address-0x10000000return 0filename = 'bf3e495f43a6b333b10ae69667304cfd2c87e9100de9d31365671c7b6b93132e'pe = pefile.PE(filename, fast_load=True)memory_mapped_image = bytearray(pe.get_memory_mapped_image())ImageBase = pe.OPTIONAL_HEADER.ImageBaseprint('[+] Map PE')BASE = 0x10000000STACK_ADDR = 0x400000STACK_SIZE = 1024 * 1024mu = Uc(UC_ARCH_X86, UC_MODE_32)mu.mem_map(BASE, 1024 * 1024)mu.mem_map(STACK_ADDR, STACK_SIZE)r_esp = STACK_ADDR + STACK_SIZE // 2mu.reg_write(UC_X86_REG_ESP, STACK_ADDR + STACK_SIZE // 2)# 将文件映射到内存中mu.mem_write(0x10000000,pe.get_memory_mapped_image())md = Cs(CS_ARCH_X86, CS_MODE_32)md.detail = Trueinstruction_3 = []def hook_code(mu, address, size, userdata):print(f'>>> Tracing instruction at {address:#x}, instruction size = {size:#x}')r_esp = mu.reg_read(UC_X86_REG_ESP)count = u32(mu.mem_read(r_esp + 4, 4))print(f'count is {count}')if count == 2:instruction_3.append(address)mu.emu_stop()try:exit()except BaseException as e:print(e)count = count + 1mu.mem_write(r_esp + 4, p32(count))mu.hook_add(UC_HOOK_CODE, hook_code)def simulate_execute(ins_addr_rva):mu.mem_write(r_esp + 4, p32(0))mu.emu_start(ins_addr_rva + ImageBase, 0x100066E6)reloc_data_rva = get_reloc_data_rva(pe)ins_addr_rva_all = []count = 0for rva in reloc_data_rva:ins_addr_rva = get_intruction_start_rva(memory_mapped_image, rva, ImageBase)if ins_addr_rva != 0:ins_addr_rva_all.append(ins_addr_rva)simulate_execute(ins_addr_rva)# 获取按顺序执行时第3条指令地址code = memory_mapped_image[ins_addr_rva:ins_addr_rva+40]ins = md.disasm(code, ImageBase + ins_addr_rva)ins_1 = next(ins)ins_2 = next(ins)try:ins_3 = next(ins)ins_3_address = ins_3.addressexcept:ins_3_address = 0ins.close()if instruction_3[count] == ins_3_address:size = ins_1.size + ins_2.sizeassembly = b'x90' * sizepatch(memory_mapped_image, ImageBase, ImageBase + ins_addr_rva, assembly)else:size = instruction_3[count] - ins_1.addressassembly = b'x90' * sizepatch(memory_mapped_image, ImageBase, ImageBase + ins_addr_rva, assembly)count = count + 1for section in pe.sections:print(f'{section.Name}, VirtualAddress: {section.VirtualAddress:#x}, 'f'Size: {section.SizeOfRawData:#x}, 文件偏移: {section.PointerToRawData:#x}')pe.set_bytes_at_rva(section.VirtualAddress,bytes(memory_mapped_image[section.VirtualAddress:section.VirtualAddress + section.SizeOfRawData]))print('[+] Save to file ' + '1.bin')pe.write('1.bin')
参考链接
https://ti.qianxin.com/blog/articles/Obfuscation-techniques-similar-to-OceanLotus/
https://github.com/levanvn/APT32_Deobfuscate/blob/master/Type2/Script/Type2_Deobfuscate.py
https://github.com/erocarrera/pefile/blob/master/pefile.py
https://bbs.pediy.com/thread-258473-1.htm
https://bbs.pediy.com/thread-224330.htm#msg_header_h3_7
看雪ID:Tangdouren
https://bbs.pediy.com/user-home-826259.htm

# 往期推荐


球分享

球点赞

球在看

点击“阅读原文”,了解更多!
原文始发于微信公众号(看雪学苑):海莲花glitch样本去混淆
免责声明:文章中涉及的程序(方法)可能带有攻击性,仅供安全研究与教学之用,读者将其信息做其他用途,由读者承担全部法律及连带责任,本站不承担任何法律及连带责任;如有问题可邮件联系(建议使用企业邮箱或有效邮箱,避免邮件被拦截,联系方式见首页),望知悉。
- 左青龙
- 微信扫一扫
-

- 右白虎
- 微信扫一扫
-


评论