SSM 整合项目
前后端分离开发, 前端框架 Vue + 后端框架 SSM
前端框架 - Vue 后台框架 - SSM (SpringMVC + Spring + MyBatis) 数据库 - MySQL 项目依赖管理 - Maven 分页 - pagehelper 逆向工程 - MyBatis Generator
搭建基础环境
创建项目
在这里我们搭建一下项目开发的基本环境设置.
pom.xml文件中进行引入我们本次开发所需要的依赖.
<dependencies><dependency> <!-- 引入 junit, 可以进行测试包 --><groupId>junit</groupId><artifactId>junit</artifactId><version>4.11</version><scope>test</scope></dependency><dependency> <!-- 引入 springMVC --><groupId>org.springframework</groupId><artifactId>spring-webmvc</artifactId><version>5.3.8</version></dependency><dependency> <!-- 支持事务相关 --><groupId>org.springframework</groupId><artifactId>spring-jdbc</artifactId><version>5.3.8</version></dependency><dependency> <!-- 支持切面编程 --><groupId>org.springframework</groupId><artifactId>spring-aspects</artifactId><version>5.3.8</version></dependency><dependency> <!-- 引入 mybatis --><groupId>org.mybatis</groupId><artifactId>mybatis</artifactId><version>3.5.7</version></dependency><dependency> <!-- 引入 druid 数据库连接池 --><groupId>com.alibaba</groupId><artifactId>druid</artifactId><version>1.2.6</version></dependency><dependency> <!-- 引入 mysql 接口驱动 --><groupId>mysql</groupId><artifactId>mysql-connector-java</artifactId><version>8.0.25</version></dependency><dependency> <!-- 配置 mybatis && spring 整合适配包 --><groupId>org.mybatis</groupId><artifactId>mybatis-spring</artifactId><version>2.0.6</version></dependency><dependency> <!-- 配置 MyBatis 逆向工程包 --><groupId>org.mybatis.generator</groupId><artifactId>mybatis-generator-core</artifactId><version>1.4.0</version></dependency><dependency> <!-- 配置 JackSon, 用于返回 JSON 数据 --><groupId>com.fasterxml.jackson.core</groupId><artifactId>jackson-databind</artifactId><version>2.12.4</version></dependency><dependency> <!-- 加入分页插件 --><groupId>com.github.pagehelper</groupId><artifactId>pagehelper</artifactId><version>5.2.1</version></dependency><dependency> <!-- 引入后端校验框架 --><groupId>org.hibernate</groupId><artifactId>hibernate-validator</artifactId><version>5.0.0.CR2</version></dependency></dependencies>
我们并没有引入spring, 这是因为, 当我们引入springmvc时, spring会自动被引入, 我们可以通过IDEA中的MAVEN管理所看到: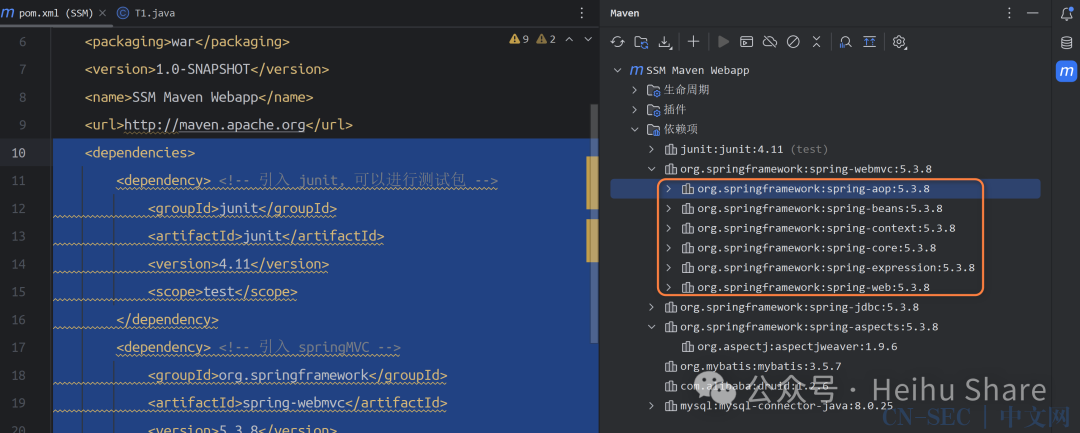 随后我们在
随后我们在IDEA中进行配置Tomcat:
Hello World, 源代码如下:
<html><body><h2>Hello World!</h2></body></html>
web.xml 配置
在这里我们定位到/webapp/WEB-INF/web.xml文件, 并且配置文件信息为如下内容:
<!DOCTYPE web-app PUBLIC"-//Sun Microsystems, Inc.//DTD Web Application 2.3//EN""http://java.sun.com/dtd/web-app_2_3.dtd" ><web-app><display-name>Archetype Created Web Application</display-name><context-param> <!-- 定义一个全局配置键值对, 用于给予 SpringMVC (ContextLoaderListener类) 使用 --><param-name>contextConfigLocation</param-name><param-value>classpath:applicationContext.xml</param-value></context-param><filter><filter-name>HiddenHttpMethodFilter</filter-name><!-- 配置好 Filter 后, 支持 rest 风格, 可以将发过来的 post 请求, 匹配 _method 参数, 转化为 DELETE|PUT 参数 --><filter-class>org.springframework.web.filter.HiddenHttpMethodFilter</filter-class></filter><filter-mapping><filter-name>HiddenHttpMethodFilter</filter-name><url-pattern>/*</url-pattern></filter-mapping><filter><filter-name>characterEncodingFilter</filter-name> <!-- 定义字符编码器, 默认 UTF-8 编码 --><filter-class>org.springframework.web.filter.CharacterEncodingFilter</filter-class><init-param><param-name>encoding</param-name><param-value>UTF-8</param-value> <!-- 定义字符集为 UTF-8 --></init-param><init-param><param-name>forceRequestEncoding</param-name><param-value>true</param-value><!--会执行 CharacterEncodingFilter::doFilterInternal 方法中的下面片段:if (this.isForceRequestEncoding() || request.getCharacterEncoding() == null) {request.setCharacterEncoding(encoding);}--></init-param><init-param><param-name>forceResponseEncoding</param-name><param-value>true</param-value><!--会执行 CharacterEncodingFilter::doFilterInternal 方法中的下面片段:if (this.isForceResponseEncoding()) {response.setCharacterEncoding(encoding);}--></init-param></filter><filter-mapping><filter-name>characterEncodingFilter</filter-name><url-pattern>/*</url-pattern></filter-mapping><listener><listener-class>org.springframework.web.context.ContextLoaderListener</listener-class><!--ContextLoaderListener (SpringMVC 提供的监听器):1. ContextLoaderListener 监听器作用是启动 WEB 容器时, 自动装配 ApplicationContext 的配置信息, 对应上 context-param 标签2. 它实现了 ServletContextListener 接口, 启动容器时, 会自动执行它实现的 contextInitialized 方法, 容器关闭时执行 contextDestroyed 方法 (监听器基础)--></listener><servlet><servlet-name>dispatcherServlet</servlet-name> <!-- 配置 SpringMVC 的 DispatcherServlet --><servlet-class>org.springframework.web.servlet.DispatcherServlet</servlet-class><!-- 因为没有指定 init-param -> contextConfigLocation, 所以会走默认的读取机制.public static final String DEFAULT_NAMESPACE_SUFFIX = "-servlet";会读取 WEB-INF/dispatcherServlet-servlet.xml 配置文件, 当作 spring 文件--><load-on-startup>1</load-on-startup> <!-- 自动启动着 --></servlet><servlet-mapping><servlet-name>dispatcherServlet</servlet-name><url-pattern>/</url-pattern> <!-- 接收全局请求 --></servlet-mapping></web-app>
随后创建/WEB-INF/dispatcherServlet-servlet.xml配置文件, 当作SpringMVC配置文件即可.
随后我们创建如下包, 用于项目后期应用:
com.heihu577.furns.Beancom.heihu577.furns.Servicecom.heihu577.furns.DAOcom.heihu577.furns.Controllercom.heihu577.furns.Utils
注意创建在
java目录下.
SpringMVC 配置
在/WEB-INF/dispatcherServlet-servlet.xml中配置如下信息:
<?xml version="1.0" encoding="UTF-8"?><beans xmlns="http://www.springframework.org/schema/beans"xmlns:xsi="http://www.w3.org/2001/XMLSchema-instance"xmlns:context="http://www.springframework.org/schema/context"xmlns:mvc="http://www.springframework.org/schema/mvc"xsi:schemaLocation="http://www.springframework.org/schema/beans http://www.springframework.org/schema/beans/spring-beans.xsd http://www.springframework.org/schema/context https://www.springframework.org/schema/context/spring-context.xsd http://www.springframework.org/schema/mvc https://www.springframework.org/schema/mvc/spring-mvc.xsd"><context:component-scan base-package="com.heihu577.furns.Controller" use-default-filters="false"><context:include-filter type="annotation" expression="org.springframework.stereotype.Controller"/><!-- 配置只扫描 @Controller 注解 --></context:component-scan><bean class="org.springframework.web.servlet.view.InternalResourceViewResolver"> <!-- 配置视图解析器 --><property name="prefix" value="/WEB-INF/views/"/><property name="suffix" value=".html"/> <!-- 用 Vue, 不用 Jsp 了 --></bean><!-- 两个常规配置 --><mvc:annotation-driven/><mvc:default-servlet-handler/></beans>
创建 Controller 进行测试

配置 Spring && MyBatis 完成整合
创建 applicationContext.xml 文件
在/resource/目录下创建applicationContext.xml文件, 文件内容如下:
<?xml version="1.0" encoding="UTF-8"?><beans xmlns="http://www.springframework.org/schema/beans"xmlns:xsi="http://www.w3.org/2001/XMLSchema-instance"xmlns:context="http://www.springframework.org/schema/context"xsi:schemaLocation="http://www.springframework.org/schema/beans http://www.springframework.org/schema/beans/spring-beans.xsd http://www.springframework.org/schema/context https://www.springframework.org/schema/context/spring-context.xsd"><!-- spring的配置文件, 主要配置和业务逻辑相关的, 比如: 数据源, 事务控制等 --><context:component-scan base-package="com.heihu577"> <!-- 包括子包 --><!-- 扫描 com.heihu577, 但是不扫描 @Controller 注解, 因为 @Controller 注解的被 SpringMVC 所接管(dispatcherServlet-servlet.xml文件) --><context:exclude-filter type="annotation" expression="org.springframework.stereotype.Controller"/></context:component-scan></beans>
创建 jdbc.properties 配置文件 && 配置数据源
因为我们要整合MyBatis, 所以在这里我们需要在/resources目录下先创建一个jdbc.properties配置文件, 用于保存我们的Mysql链接信息.
jdbc.driverClass=com.mysql.cj.jdbc.Driverjdbc.url=jdbc:mysql://127.0.0.1:3306/furns_ssm?useSSL=true&useUnicode=true&characterEncoding=UTF-8jdbc.userName=rootjdbc.password=root
定义完毕之后, 我们在/resources/applicationContext.xml文件中, 进行配置数据源:
<context:property-placeholder location="classpath:jdbc.properties"/> <!-- 将 jdbc.properties 配置信息引入进来 --><bean id="pooledDataSource" class="com.alibaba.druid.pool.DruidDataSource"> <!-- 配置 Druid 数据源 --><property name="driverClassName" value="${jdbc.driverClass}"/><property name="url" value="${jdbc.url}"/><property name="username" value="${jdbc.userName}"/><property name="password" value="${jdbc.password}"/></bean>
配置 Spring 与 MyBatis 整合
这里应用的是mybatis-spring包的应用, 随后我们在/resources/applicationContext.xml文件中进行配置:
<bean class="org.mybatis.spring.SqlSessionFactoryBean" id="sqlSessionFactory"> <!-- 用于整合 spring 与 mybatis --><property name="dataSource" ref="pooledDataSource"/> <!-- 引入进来数据源 --><property name="configLocation" value="classpath:mybatis-config.xml"/> <!-- 引入 mybatis-config.xml 的配置文件 --><property name="mapperLocations" value="classpath:Mapper/*.xml"/> <!-- 指定 Mapper.xml 文件所在的目录进行扫描, 在这里我们在 /resources/Mapper 目录下存放 xml 文件 --></bean>
配置好该Bean后, 我们需要在/resources/目录下创建mybatis-config.xml文件以及Mapper目录.
mybatis-config.xml 文件
<?xml version="1.0" encoding="UTF-8" ?><!DOCTYPE configurationPUBLIC "-//mybatis.org//DTD Config 3.0//EN""https://mybatis.org/dtd/mybatis-3-config.dtd"><configuration><settings> <!-- 配置 MyBatis 日志 --><setting name="logImpl" value="STDOUT_LOGGING"/></settings></configuration>
目前无需配置任何内容.
将 MyBatis 接口扫描到 IOC 容器中
在applicationContext.xml文件中进行配置如下Bean:
<!-- 配置扫描器, 将mybatis接口的实现加入到ioc容器中 --><bean class="org.mybatis.spring.mapper.MapperScannerConfigurer"><!-- 这里DAO接口, 就是 Mapper 接口 --><property name="basePackage" value="com.heihu577.furns.DAO"/></bean>
配置事务管理
在applicationContext.xml文件中进行配置如下Bean:
<!-- 配置事务控制, 事务管理 --><bean id="transactionManager" class="org.springframework.jdbc.datasource.DataSourceTransactionManager"><property name="dataSource" ref="pooledDataSource"/></bean><!-- 配置启动基于注解的声明式事务管理功能 --><tx:annotation-driven transaction-manager="transactionManager"/>
当配置完transactionManager后, 就可以在Service中使用@Transaction注解, 来声明事务方法.
使用Spring-AOP进行配置
使用<tx:annotation-driven>标签配置, 这种方法比较常规, 下面我们可以看一下另一种配置事务的方法:
<!-- 配置事务控制, 事务管理 --><bean id="transactionManager" class="org.springframework.jdbc.datasource.DataSourceTransactionManager"><property name="dataSource" ref="pooledDataSource"/></bean><!-- 配置启动基于注解的声明式事务管理功能 --><!-- <tx:annotation-driven transaction-manager="transactionManager"/>--><tx:advice id="txAdvice"> <!-- 定义事务方法 --><tx:attributes><tx:method name="*"/> <!-- * 代表所有方法都是事务方法 --><tx:method name="get*" read-only="true"/> <!-- 以get开始的所有方法, 都是只读方法, 进行优化 --></tx:attributes></tx:advice><aop:config><aop:pointcut id="txPoint" expression="execution(* com.heihu577.furns.Service..*(..))"/> <!-- 定义切入点表达式 --><aop:advisor advice-ref="txAdvice" pointcut-ref="txPoint"/> <!-- 配置事务规则 && 切入点表达式, 也就是 Service 包下的所有 Service 的所有方法, 都是事务方法 --></aop:config>
基础环境配置大概图
至此, 我们的SSM已配置完毕, 整个项目以及它们的解释如下:
XXXMapper.xml文件, 定义一个临时测试数据内容如下:
<?xml version="1.0" encoding="UTF-8" ?><!DOCTYPE mapperPUBLIC "-//mybatis.org//DTD Mapper 3.0//EN""https://mybatis.org/dtd/mybatis-3-mapper.dtd"><mapper namespace="com.heihu577.furns.Controller.TestController"></mapper>
否则我们测试会出错.
测试结果
public class T1 {@Testpublic void t1() {ApplicationContext ioc = new ClassPathXmlApplicationContext("applicationContext.xml");System.out.println(ioc.getBean("pooledDataSource"));System.out.println(ioc.getBean("sqlSessionFactory"));/** 四月 29, 2024 10:47:34 上午 org.apache.ibatis.logging.commons.JakartaCommonsLoggingImpl warn警告: No MyBatis mapper was found in '[com.heihu577.furns.DAO]' package. Please check your configuration.{CreateTime:"2024-04-29 10:47:34",ActiveCount:0,PoolingCount:0,CreateCount:0,DestroyCount:0,CloseCount:0,ConnectCount:0,Connections:[]}org.apache.ibatis.session.defaults.DefaultSqlSessionFactory@273444fe* */}}
可以看到, 我们所配置的Bean已成功生效, 已完成所有整合.
MyBatis 逆向工程
创建 库 && 表
DROP DATABASE IF EXISTS `furns_ssm`;CREATE DATABASE `furns_ssm` CHARACTER SET UTF8;USE `furns_ssm`CREATE TABLE `furn`(id int unsigned primary key auto_increment comment 'ID值',name varchar(64) not null comment '家具名',maker varchar(64) not null comment '商家',price decimal(11,2) not null comment '保留两位小数',sales int unsigned not null comment '销量',stock int unsigned not null comment '库存',img_path varchar(256) not null comment '图片路径')charset utf8 engine innodb;INSERT INTO furn(`id` , `name` , `maker` , `price` , `sales` , `stock` , `img_path`)VALUES(NULL , '北欧风格小桌子' , '熊猫家居' , 180 , 666 , 7 ,'assets/images/product-image/6.jpg');INSERT INTO furn(`id` , `name` , `maker` , `price` , `sales` , `stock` , `img_path`)VALUES(NULL , '简约风格小椅子' , '熊猫家居' , 180 , 666 , 7 ,'assets/images/product-image/4.jpg');INSERT INTO furn(`id` , `name` , `maker` , `price` , `sales` , `stock` , `img_path`)VALUES(NULL , '典雅风格小台灯' , '蚂蚁家居' , 180 , 666 , 7 ,'assets/images/product-image/14.jpg');
最终结果如下:
mysql> SELECT * FROM `furn`;+----+-----------------------+--------------+--------+-------+-------+------------------------------------+| id | name | maker | price | sales | stock | img_path |+----+-----------------------+--------------+--------+-------+-------+------------------------------------+| 1 | 北欧风格小桌子 | 熊猫家居 | 180.00 | 666 | 7 | assets/images/product-image/6.jpg || 2 | 简约风格小椅子 | 熊猫家居 | 180.00 | 666 | 7 | assets/images/product-image/4.jpg || 3 | 典雅风格小台灯 | 蚂蚁家居 | 180.00 | 666 | 7 | assets/images/product-image/14.jpg |+----+-----------------------+--------------+--------+-------+-------+------------------------------------+3 rows in set (0.00 sec)mysql> DESC `furn`;+----------+------------------+------+-----+---------+----------------+| Field | Type | Null | Key | Default | Extra |+----------+------------------+------+-----+---------+----------------+| id | int(10) unsigned | NO | PRI | NULL | auto_increment || name | varchar(64) | NO | | NULL | || maker | varchar(64) | NO | | NULL | || price | decimal(11,2) | NO | | NULL | || sales | int(10) unsigned | NO | | NULL | || stock | int(10) unsigned | NO | | NULL | || img_path | varchar(256) | NO | | NULL | |+----------+------------------+------+-----+---------+----------------+7 rows in set (0.14 sec)
在 mybatis-config.xml 文件中配置类型别名
<?xml version="1.0" encoding="UTF-8" ?><!DOCTYPE configurationPUBLIC "-//mybatis.org//DTD Config 3.0//EN""https://mybatis.org/dtd/mybatis-3-config.dtd"><configuration><settings><setting name="logImpl" value="STDOUT_LOGGING"/> <!-- 日志信息 --></settings><typeAliases><package name="com.heihu577.furns.Bean"/> <!-- 扫描所有类型, 配置类型别名 --></typeAliases></configuration>
配置 MyBatis-Generator
根据官方文档: https://mybatis.org/generator/
找到https://mybatis.org/generator/configreference/xmlconfig.html, 其中给了MyBatis-Generator所需要的XML文档. 在pom.xml同级目录(根目录)下创建mbg.xml, 用来定义MyBatis-Generator的配置文件:
<?xml version="1.0" encoding="UTF-8"?><!DOCTYPE generatorConfigurationPUBLIC "-//mybatis.org//DTD MyBatis Generator Configuration 1.0//EN""http://mybatis.org/dtd/mybatis-generator-config_1_0.dtd"><generatorConfiguration><context id="DB2Tables" targetRuntime="MyBatis3"><plugin type="org.mybatis.generator.plugins.UnmergeableXmlMappersPlugin"/> <!-- 用来解决mybatis-generator生成出来的Mapper.xml文件可能重复问题, 而导致报错问题 --><!-- 参考: https://blog.csdn.net/weixin_43524910/article/details/116722824 --><commentGenerator><property name="suppressAllComments" value="true"/> <!-- 生成没有目录的 Bean --></commentGenerator><jdbcConnection driverClass="com.mysql.cj.jdbc.Driver"connectionURL="jdbc:mysql://127.0.0.1:3306/furns_ssm?useSSL=true&useUnicode=true&characterEncoding=UTF-8"userId="root"password="root"> <!-- 配置数据库链接信息 --></jdbcConnection><javaTypeResolver><property name="forceBigDecimals" value="false"/></javaTypeResolver><!-- 指明 JavaBean 生成的位置 --><javaModelGenerator targetPackage="com.heihu577.furns.Bean" targetProject=".srcmainjava"><!--targetPackage: 最终生成的 Bean 存放在哪里targetProject: 当前java目录 (包所在路径)含义翻译: 是放在 targetProject 目录下的 targetPackage 包中.--><property name="enableSubPackages" value="true"/><property name="trimStrings" value="true"/></javaModelGenerator><!-- 指明 Mapper.xml 文件最终存放在哪里 --><sqlMapGenerator targetPackage="Mapper" targetProject=".srcmainresources"><!--targetPackage: 最后生成出来的 Mapper.xml 文件存放在哪里, 这里指明了 Mapper 目录targetProject: 当前资源目录含义翻译: 是放在 targetProject 目录下的 targetPackage (包|目录) 中--><property name="enableSubPackages" value="true"/></sqlMapGenerator><!-- 指定 Mapper 接口放在哪里 --><javaClientGenerator type="XMLMAPPER" targetPackage="com.heihu577.furns.DAO" targetProject=".srcmainjava"><property name="enableSubPackages" value="true"/></javaClientGenerator><!--tableName: 指定要对哪张表进行生成domainObjectName: 指定生成出来 BEAN 的名称--><table tableName="furn" domainObjectName="Furn"/></context></generatorConfiguration>
生成测试程序
根据https://mybatis.org/generator/running/runningWithJava.html给出的测试代码, 我们可以本地测试:
package org.heihu577.Test;import org.junit.Test;import org.mybatis.generator.api.MyBatisGenerator;import org.mybatis.generator.config.Configuration;import org.mybatis.generator.config.xml.ConfigurationParser;import org.mybatis.generator.exception.InvalidConfigurationException;import org.mybatis.generator.exception.XMLParserException;import org.mybatis.generator.internal.DefaultShellCallback;import java.io.File;import java.io.IOException;import java.sql.SQLException;import java.util.ArrayList;import java.util.List;public class TestMBG {@Testpublic void t1() throws SQLException, IOException, InterruptedException, XMLParserException, InvalidConfigurationException {List<String> warnings = new ArrayList<String>();boolean overwrite = true;File configFile = new File("mbg.xml"); // 指定刚刚定义的文件名称ConfigurationParser cp = new ConfigurationParser(warnings);Configuration config = cp.parseConfiguration(configFile);DefaultShellCallback callback = new DefaultShellCallback(overwrite);MyBatisGenerator myBatisGenerator = new MyBatisGenerator(config, callback, warnings);myBatisGenerator.generate(null);}}
最终运行结果:
Bean, Mapper接口, Mapper.xml文件.
注意: 使用 MyBatis-generator 所生成的 Bean 文件, 需要自己指定 有参构造 && 无参构造
测试Mapper && 常用方法说明
比如: User 里面有三个字段 id(主键), username, password
插入操作
int insert(Furn record);int insertSelective(Furn record);
假设有如下Bean:
User user = new User(); user.setUsername("张三");
那么, insertSelective方法会执行如下SQL:
INSERT INTO user(id, username) VALUES(null, "张三") -- 会根据 bean 中不是 null 的值进行插入
而insert方法会执行如下SQL:
INSERT INTO user(id, username, password) VALUES(null, "张三", null) -- 无论bean中是如何设置的, 都会插入
可以看到, insertSelective更加灵活.
测试:
public class TestFurnMapper {@Testpublic void t1() {/*插入前:mysql> SELECT * FROM `furn`;+----+-----------------------+--------------+--------+-------+-------+------------------------------------+| id | name | maker | price | sales | stock | img_path |+----+-----------------------+--------------+--------+-------+-------+------------------------------------+| 1 | 北欧风格小桌子 | 熊猫家居 | 180.00 | 666 | 7 | assets/images/product-image/6.jpg || 2 | 简约风格小椅子 | 熊猫家居 | 180.00 | 666 | 7 | assets/images/product-image/4.jpg || 3 | 典雅风格小台灯 | 蚂蚁家居 | 180.00 | 666 | 7 | assets/images/product-image/14.jpg |+----+-----------------------+--------------+--------+-------+-------+------------------------------------+3 rows in set (0.00 sec)*/ApplicationContext ioc = new ClassPathXmlApplicationContext("applicationContext.xml");FurnMapper furnMapper = ioc.getBean(FurnMapper.class);// 因为在 applicationContext 中定义了 MapperScannerConfigurer, 所以可以通过类型来进行获取// System.out.println(furnMapper); // org.apache.ibatis.binding.MapperProxy@126253fdFurn furn = new Furn();furn.setName("乌漆嘛黑大桌子");furn.setMaker("蓝猫家具");furn.setPrice(new BigDecimal("88.88"));furn.setSales(50);furn.setStock(6);furn.setImgPath("nonono.jpg");int affectedRow = furnMapper.insert(furn);System.out.println("受影响的行数: " + affectedRow);/*插入后:mysql> SELECT * FROM `furn`;+----+-----------------------+--------------+--------+-------+-------+------------------------------------+| id | name | maker | price | sales | stock | img_path |+----+-----------------------+--------------+--------+-------+-------+------------------------------------+| 1 | 北欧风格小桌子 | 熊猫家居 | 180.00 | 666 | 7 | assets/images/product-image/6.jpg || 2 | 简约风格小椅子 | 熊猫家居 | 180.00 | 666 | 7 | assets/images/product-image/4.jpg || 3 | 典雅风格小台灯 | 蚂蚁家居 | 180.00 | 666 | 7 | assets/images/product-image/14.jpg || 4 | 乌漆嘛黑大桌子 | 蓝猫家具 | 88.88 | 50 | 6 | nonono.jpg |+----+-----------------------+--------------+--------+-------+-------+------------------------------------+4 rows in set (0.00 sec)*/}}
删除操作
@Testpublic void t2() {ClassPathXmlApplicationContext ioc = new ClassPathXmlApplicationContext("applicationContext.xml");FurnMapper furnMapper = ioc.getBean(FurnMapper.class);int i = furnMapper.deleteByPrimaryKey(4);System.out.println("受影响的行数: " + i);/** JDBC Connection [com.mysql.cj.jdbc.ConnectionImpl@5454d35e] will not be managed by Spring==> Preparing: delete from furn where id = ?==> Parameters: 4(Integer)<== Updates: 1Closing non transactional SqlSession [org.apache.ibatis.session.defaults.DefaultSqlSession@4c012563]受影响的行数: 1* */}
修改操作
@Testpublic void t3() {ClassPathXmlApplicationContext ioc = new ClassPathXmlApplicationContext("applicationContext.xml");FurnMapper furnMapper = ioc.getBean(FurnMapper.class);Furn furn = new Furn();furn.setId(3); // 修改 ID 为 3 的数据furn.setMaker("修改家具"); // 修改 maker 字段内容furnMapper.updateByPrimaryKeySelective(furn);/*JDBC Connection [com.mysql.cj.jdbc.ConnectionImpl@481ba2cf] will not be managed by Spring==> Preparing: update furn SET maker = ? where id = ?==> Parameters: 修改家具(String), 3(Integer)<== Updates: 1Closing non transactional SqlSession [org.apache.ibatis.session.defaults.DefaultSqlSession@4c012563]* */furnMapper.updateByPrimaryKey(furn);// 这个会报错, 因为 SQL 语句为// update furn set name = ?, maker = ?, price = ?, sales = ?, stock = ?, img_path = ? where id = ?// 实际情况我们只传入了一个 maker 以及 id, 并不需要修改这么多字段}
查询方法
@Testpublic void t4() {ClassPathXmlApplicationContext ioc = new ClassPathXmlApplicationContext("applicationContext.xml");FurnMapper furnMapper = ioc.getBean(FurnMapper.class);Furn furn = furnMapper.selectByPrimaryKey(1);System.out.println(furn);/** JDBC Connection [com.mysql.cj.jdbc.ConnectionImpl@1115ec15] will not be managed by Spring==> Preparing: select id, name, maker, price, sales, stock, img_path from furn where id = ?==> Parameters: 1(Integer)<== Columns: id, name, maker, price, sales, stock, img_path<== Row: 1, 北欧风格小桌子, 熊猫家居, 180.00, 666, 7, assets/images/product-image/6.jpg<== Total: 1Closing non transactional SqlSession [org.apache.ibatis.session.defaults.DefaultSqlSession@4c012563]com.heihu577.furns.Bean.Furn@63f259c3* */}
搭建 Vue3 前端工程
NodeJs 官网: https://nodejs.org/download/release/Vue 官网: https://cli.vuejs.org/zh/, Vue 安装过程: https://cli.vuejs.org/zh/guide/Vue 参考 https://blog.csdn.net/YooYee233/article/details/127778729
安装脚手架全过程
这里我们选择14.17.3版本: https://nodejs.org/download/release/v14.17.3/, 安装完 NodeJs 后, 使用node -v && npm -v查看版本确认无误.
C:UsersAdministrator>node -vv14.17.3C:UsersAdministrator>npm -v6.14.13
因为是前后端分离项目, 所以我们在一个位置上创建SSM_VUE目录, 使用npm install -g @vue/cli进行安装vue. 保证安装成功.
C:UsersAdministratorIdeaProjectsSSM_VUE (空目录,放置VUE用)>vue -V@vue/cli 5.0.8
随后我们通过vue create ssm_vue命令来进行创建一个Vue项目:
C:UsersAdministratorIdeaProjectsSSM_VUE>vue create ssm_vueVue CLI v5.0.8? Please pick a preset:Default ([Vue 3] babel, eslint)Default ([Vue 2] babel, eslint)> Manually select features (选择这个)Vue CLI v5.0.8 (使用空格选择带星号的, 按回车结束)? Please pick a preset: Manually select features? Check the features needed for your project: (Press <space> to select, <a> to toggle all, <i> to invert selection, and<enter> to proceed)(*) Babel( ) TypeScript( ) Progressive Web App (PWA) Support(*) Router(*) Vuex( ) CSS Pre-processors>( ) Linter / Formatter( ) Unit Testing( ) E2E TestingVue CLI v5.0.8? Please pick a preset: Manually select features? Check the features needed for your project: Babel, Router, Vuex? Choose a version of Vue.js that you want to start the project with (Use arrow keys)> 3.x2.xVue CLI v5.0.8? Please pick a preset: Manually select features? Check the features needed for your project: Babel, Router, Vuex? Choose a version of Vue.js that you want to start the project with 3.x? Use history mode for router? (Requires proper server setup for index fallback in production) Yes? Where do you prefer placing config for Babel, ESLint, etc.?In dedicated config files> In package.json? Save this as a preset for future projects? (y/N) y? Save preset as: Heihu_SSM🎉 Successfully created project ssm_vue.👉 Get started with the following commands:$ cd ssm_vue$ npm run serve
随后根据最后两行执行命令即可开启Vue脚手架.
DONE Compiled successfully in 5035ms 上午8:22:01App running at:- Local: http://localhost:8085/ (运行在 8085 端口)- Network: http://192.168.137.219:8085/Note that the development build is not optimized.To create a production build, run npm run build.
运行成功图 && 配置 IDEA
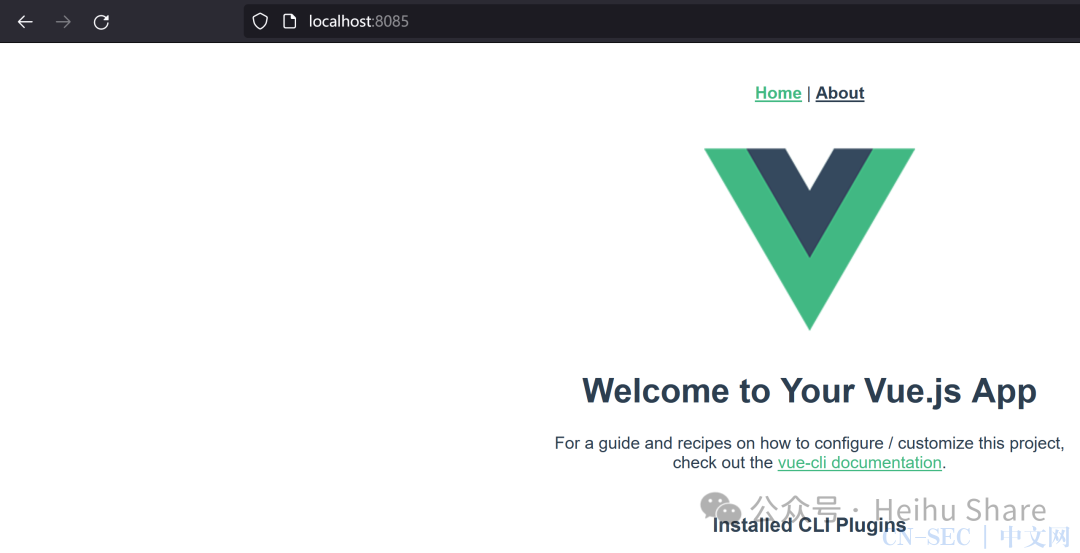 随后我们右键刚刚创建的
ssm_vue目录, 以IDEA打开, 然后选择在新窗口打开: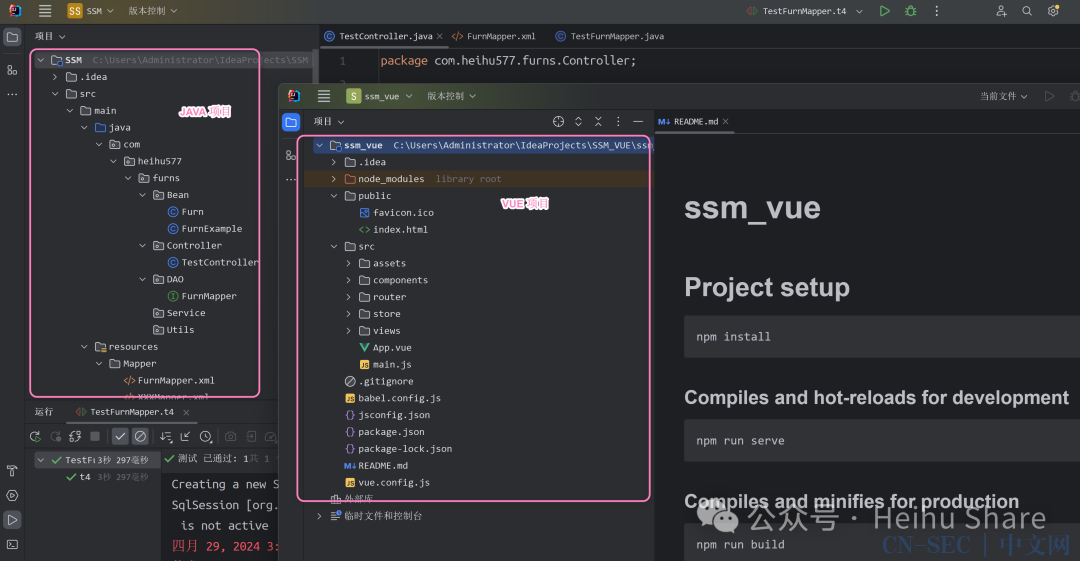 随后配置
随后配置IDEA运行VUE:
安装 vue.js 插件
直接在IDEA的设置 -> 插件管理中搜索vue.js插件即可.
Vue3 框架分析
首先我们看一下大体布局: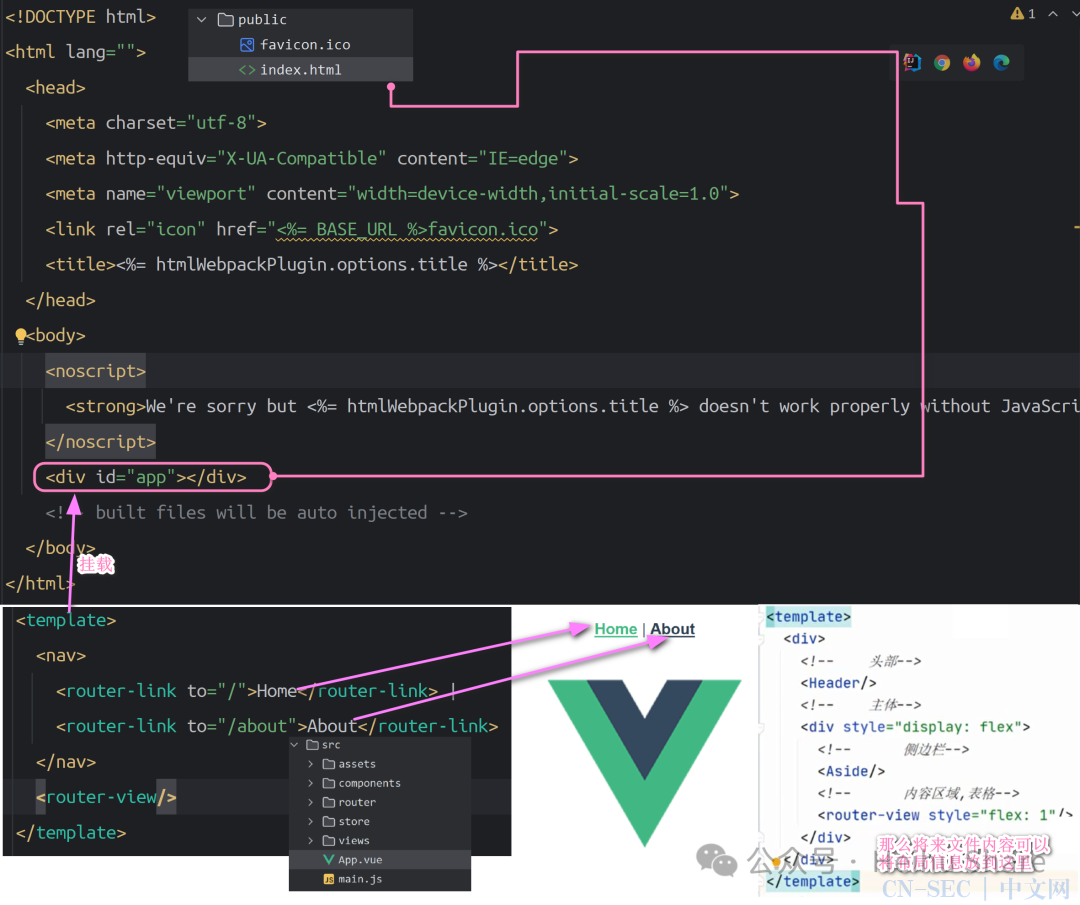 其中
其中index.html是页面首页来的, 然后App.vue中的nav标签将来可以放入布局信息, router-view标签是用来显示路由的, 根据URL返回不同的界面, 其具体原因如下: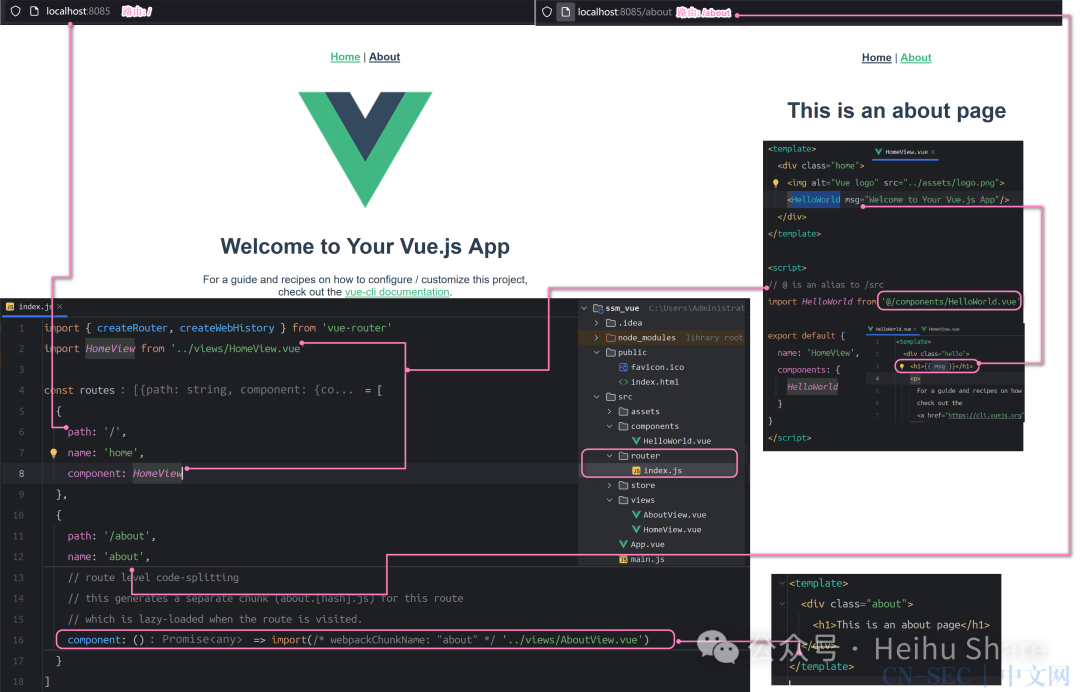 最后, 框架的目录结构如下:
配置 Vue.js 端口
直接在vue.config.js文件中插入如下代码:
module.exports = {devServer: {port: 10000}}
安装 ElementPlus
Element UI 官方文档 (Vue2): https://element.eleme.cn/#/zh-CNElement Plus 官方文档 (Vue3): https://element-plus.gitee.io/zh-CN/ (慢) || http://element-plus.org/zh-CN/ (快)
安装 ElementPlus 比较简单, 直接执行如下命令:
npm install element-plus --save这些可以根据官网的步骤来: https://element-plus.gitee.io/zh-CN/guide/installation.html
创建项目基础界面
修改默认的 Vue 界面
接下来我们就通过Vue3 + ElementPlus来搭建一个项目界面, 界面如下:
修改src/App.vue文件内容为如下:
<template><!--之前的代码:<nav><router-link to="/">Home</router-link> |<router-link to="/about">About</router-link></nav><router-view/>--><div></div></template><style></style><script setup></script>
此时启动Vue3即可看到空白界面...
设计导航栏
修改src/views/HomeView.vue文件内容如下:
<template><!-- <div class="home">--><!-- <img alt="Vue logo" src="../assets/logo.png">--><!-- <HelloWorld msg="Welcome to Your Vue.js App"/>--><!-- </div>--><div></div></template><script>export default {name: 'HomeView',components: {}}</script>
删除src/components/HelloWorld.vue, 创建src/components/Header.vue
<template><!-- 管理页面的头部分 --><div style="height: 50px;line-height: 50px;border-bottom: 1px solid #ccc; display: flex"><div style="width: 200px;padding-left: 30px;font-weight: bold; color: dodgerblue">后台管理</div><div style="flex: 1"></div> <!-- 导航栏分成三部分, 前面200px, 后面100px, 中间填充 --><div style="width: 100px">下拉框</div></div></template><script>export default {name: 'Header'}</script>
当然, 当我们创建完毕之后, 我们可以在App.vue中进行引入我们创建的Header.vue组件:
<template><div><Header/> <!-- 3. 使用 Header 组件 -->Home</div></template><style></style><script>import Header from "@/components/Header.vue"; // 1. 引入进来export default {name: "Layout",components: {Header // 2. 导出该组件, 否则无法使用}}</script>
做好这些工作后, 前端界面展示如下:
引入全局 CSS 样式
随后我们在src/assets/css目录中创建global.css, 用来当作全局CSS样式:
* {padding: 0px;margin: 0px;box-sizing: border-box;}
随后我们在main.js进行引入我们的global.css即可, 如下:
import { createApp } from 'vue'import App from './App.vue'import router from './router'import store from './store'import "@/assets/css/global.css" // 进行引入 CSS 文件createApp(App).use(store).use(router).mount('#app')
引入 ElementPlus
继续修改main.js文件内容如下:
import { createApp } from 'vue'import App from './App.vue'import router from './router'import store from './store'import "@/assets/css/global.css" // 进行引入 CSS 文件import ElementPlus from "element-plus" // 引入 ElementPlusimport "element-plus/dist/index.css" // 引入 ElementPluscreateApp(App).use(store).use(router).use(ElementPlus).mount('#app') // 添加 .use(ElementPlus)
添加一个按钮进行测试
我们可以根据ElementPlus的官网, 来进行引入按钮, 并且自带样式. 修改App.vue文件内容如下:
<template><div><Header/>Home <el-button>我的按钮</el-button></div></template><style></style><script>import Header from "@/components/Header.vue";export default {name: "Layout",components: {Header}}</script>
最终运行结果:
引入下拉菜单
根据http://element-plus.org/zh-CN/component/dropdown.html中, 随意挑选一个样式, 我们放入到src/components/Header.vue中:
<template><!-- 管理页面的头部分 --><div style="height: 50px;line-height: 50px;border-bottom: 1px solid #ccc; display: flex"><div style="width: 200px;padding-left: 30px;font-weight: bold; color: dodgerblue">后台管理</div><div style="flex: 1"></div> <!-- 导航栏分成三部分, 前面200px, 后面100px, 中间填充 --><div style="width: 100px"><el-dropdown><span class="el-dropdown-link">tom</span><template #dropdown><el-dropdown-menu><el-dropdown-item>个人信息</el-dropdown-item><el-dropdown-item>退出登录</el-dropdown-item></el-dropdown-menu></template></el-dropdown></div></div></template><script>import {ArrowDown} from '@element-plus/icons-vue'export default {name: 'Header'}</script><style scoped>.example-showcase .el-dropdown-link {cursor: pointer;color: var(--el-color-primary);display: flex;align-items: center;}</style>
创建侧边栏 && 布局
首先我们创建/src/components/Aside.vue文件, 文件内容如下:
<script>export default {name: "Aside" // 定义组件名称}</script><template><div><!-- 引入导航菜单 --><el-menudefault-active="2"class="el-menu-vertical-demo"@open="handleOpen"@close="handleClose"><el-sub-menu index="1"><template #title><el-icon><location /></el-icon><span>Navigator One</span></template><el-menu-item-group title="Group One"><el-menu-item index="1-1">item one</el-menu-item><el-menu-item index="1-2">item two</el-menu-item></el-menu-item-group><el-menu-item-group title="Group Two"><el-menu-item index="1-3">item three</el-menu-item></el-menu-item-group><el-sub-menu index="1-4"><template #title>item four</template><el-menu-item index="1-4-1">item one</el-menu-item></el-sub-menu></el-sub-menu><el-menu-item index="2"><el-icon><icon-menu /></el-icon><span>Navigator Two</span></el-menu-item><el-menu-item index="3" disabled><el-icon><document /></el-icon><span>Navigator Three</span></el-menu-item><el-menu-item index="4"><el-icon><setting /></el-icon><span>Navigator Four</span></el-menu-item></el-menu></div></template><style scoped></style>
其中该内容是通过官方文档中的侧边栏进行摘抄的, 后续我们可以将其中的文本改成我们的文本:
/src/App.vue文件中进行导入 && 导出 && 应用, 核心代码如下:
<template><div><!-- 头部 --><Header/><!-- 下边部分 --><div style="display: flex"> <!-- 弹性部分 --><Aside/> <!-- 侧边栏 && 应用 --><router-view style="flex: 1"/> <!-- 这个部分通过路由展示, 通过URL来显示不同界面, 默认路由到 / --></div></div></template><style></style><script>// ...import Aside from "@/components/Aside.vue"; // 导入export default {name: "Layout",components: {Header,Aside // 导出}}</script>
在其中代码中, 我们右边部分使用了<router-view>标签进行解析路由, 我们可以通过访问/about以及/来查看一下区别: 而路由的定义则是在
/router/index.js文件中定义的, 如图:
修改默认路由 -> /
当我们访问主页时, 我们希望默认先展示的是表格数据, 那么根据上面的图片, 我们应该修改的是/src/views/HomeView.vue文件, 文件内容如下:
<template><div><el-table :data="tableData" style="width: 100%"> <!-- :data 进行数据绑定, 我们需要在下面进行声明 tableData --><el-table-column sortable prop="date" label="Date" width="180"/> <!-- 加入 sortable 属性可以进行排序 --><el-table-column prop="name" label="Name" width="180"/><el-table-column prop="address" label="Address"/></el-table></div></template><script>export default {name: 'HomeView',components: {},data() { // 声明该数据域return {tableData: [{date: '2016-05-03',name: 'Tom',address: 'No. 189, Grove St, Los Angeles',},{date: '2016-05-02',name: 'Tom',address: 'No. 189, Grove St, Los Angeles',},{date: '2016-05-04',name: 'Tom',address: 'No. 189, Grove St, Los Angeles',},{date: '2016-05-01',name: 'Tom',address: 'No. 189, Grove St, Los Angeles',}]}}}</script>
对默认路由 / 进行分割区域
上面的步骤我们完成了表格, 在这里我们可以进行增加两个按钮, 以及搜索框, 所以在template部分我们可以修改为如下代码:
<template><div><div style="margin: 10px 5px;"> <!-- 按钮部分 --><el-button type="primary">新增</el-button><el-button>其他</el-button></div><div style="margin: 10px 5px;"> <!-- 搜索部分 --><el-input v-model="input" style="width: 280px" placeholder="Please input" /> <!-- 输入框 --><el-button>搜索</el-button> <!-- 按钮 --></div><div><el-table :data="tableData" style="width: 100%"> <!-- 列表部分 --><el-table-column sortable prop="date" label="Date" width="180"/><el-table-column prop="name" label="Name" width="180"/><el-table-column prop="address" label="Address"/><el-table-column label="Operations"> <!-- 增加一列操作按钮 --><template #default="scope"> <!-- 后面再研究具体含义 --><el-button size="small" @click="handleEdit(scope.$index, scope.row)">Edit</el-button><el-buttonsize="small"type="danger"@click="handleDelete(scope.$index, scope.row)">Delete</el-button></template></el-table-column></el-table></div></div></template>
最终运行效果如下:
Vue 国际化
直接参考http://element-plus.org/zh-CN/guide/i18n.html即可. 在src/main.js文件中增加如下内容:
import zhCn from 'element-plus/es/locale/lang/zh-cn' // 引入中文createApp(App).use(store).use(router).use(ElementPlus, {locale: zhCn // 增加该语句}).mount('#app')
项目部分
添加家具
Service 设置
首先我们定义一个FurnService接口, 接口内容如下:
package com.heihu577.furns.Service;import com.heihu577.furns.Bean.Furn;public interface FurnService {public void save(Furn furn);}
随后定义FurnServiceImpl进行实现它:
@Servicepublic class FurnServiceImpl implements FurnService {@Resource // 自动装配, 因为定义过 MapperScannerprivate FurnMapper furnMapper;@Overridepublic void save(Furn furn) {furnMapper.insertSelective(furn);}}
测试运行结果
创建如下测试类:
public class FurnServiceTest {private ApplicationContext ioc;private FurnService furnService;@Beforepublic void init() {ioc = new ClassPathXmlApplicationContext("applicationContext.xml");furnService = ioc.getBean(FurnService.class);}@Testpublic void testSave() {Furn furn = new Furn();furn.setName("黑客风格牛逼桌");furn.setMaker("新增测试家具");furn.setPrice(new BigDecimal("123.00"));furn.setSales(120);furn.setStock(88);furn.setImgPath("./test.jpg");furnService.save(furn);/*==> Preparing: insert into furn ( name, maker, price, sales, stock, img_path ) values ( ?, ?, ?, ?, ?, ? )==> Parameters: 黑客风格牛逼桌(String), 新增测试家具(String), 123.00(BigDecimal), 120(Integer), 88(Integer), ./test.jpg(String)<== Updates: 1*/}}
给 imgPath 字段默认值
我们可以修改JavaBean进行设置默认值:
public class Furn {private Integer id;private String name;private String maker;private BigDecimal price;private Integer sales;private Integer stock;private String imgPath = "./default.jpg";public Furn(Integer id, String name, String maker, BigDecimal price, Integer sales, Integer stock, String imgPath) {this.id = id;this.name = name;this.maker = maker;this.price = price;this.sales = sales;this.stock = stock;this.imgPath = imgPath;if (imgPath != null && !imgPath.equals("")) { // 也可以使用 Spring框架提供的 StringUtils.hasText(imgPath) 方法进行判断this.imgPath = imgPath;}}public Furn() {}// 其他方法...}
创建返回 Java 接收的 Bean
public class Msg {private int code; // 浏览器返回的状态码private String info; // 浏览器返回的信息private Map<String, Object> map = new ConcurrentHashMap<>();public static Msg success() {Msg msg = new Msg();msg.setCode(200); // 浏览器返回的状态码msg.setInfo("success"); // 返回核心信息return msg;}public static Msg fail() {Msg msg = new Msg();msg.setCode(400); // 浏览器返回的状态码msg.setInfo("fail"); // 返回核心信息return msg;}public Msg add(String key, Object value) {map.put(key, value);return this;}// ... 其他 getter && setter}
创建 Controller
@Controllerpublic class FurnController {@Resourceprivate FurnService furnService;@PostMapping("/save")@ResponseBody // 返回 JSON 数据public Msg save(@RequestBody Furn furn) { // 接收 JSON 数据furnService.save(furn);Msg success = Msg.success();return success;}}
最终运行结果:
单机《添加》弹出表单框
根据http://element-plus.org/zh-CN/component/dialog.html, 我们可以得到对应的Vue代码块, 调试最终如下:
<template><div><div style="margin: 10px 5px;"> <!-- 按钮部分 --><el-button type="primary" plain @click="dialogVisible = true; this.form = {}">新增</el-button> <!-- 单机时, 弹出对话框, 并且初始化 form 对象中的属性全为空, 否则会保留上次的数据 --><el-button>其他</el-button></div><el-dialogv-model="dialogVisible"title="Tips"width="500":before-close="handleClose"><el-form :model="form" label-width="auto" style="max-width: 600px"><el-form-item label="家具名"><el-input v-model="form.name"/> <!-- 要与 JavaBean 保持一致, 对象的属性可以动态生成 --></el-form-item><el-form-item label="厂商名"><el-input v-model="form.maker"/></el-form-item><el-form-item label="价格"><el-input v-model="form.price"/></el-form-item><el-form-item label="销量"><el-input v-model="form.sales"/></el-form-item><el-form-item label="库存"><el-input v-model="form.stock"/></el-form-item><el-form-item><el-button type="primary" @click="save">添加</el-button> <!-- 单机后, 调用 save 方法 --><el-button @click="dialogVisible = false">取消</el-button> <!-- 单机后关闭弹窗 --></el-form-item></el-form></el-dialog><div style="margin: 10px 5px;"> <!-- 搜索部分 --><el-input v-model="input" style="width: 280px" placeholder="Please input"/> <!-- 输入框 --><el-button>搜索</el-button> <!-- 按钮 --></div><div><el-table :data="tableData" style="width: 100%"> <!-- 列表部分 --><el-table-column sortable prop="date" label="Date" width="180"/><el-table-column prop="name" label="Name" width="180"/><el-table-column prop="address" label="Address"/><el-table-column label="Operations"> <!-- 增加一列操作按钮 --><template #default="scope"> <!-- 后面再研究具体含义 --><el-button size="small" @click="handleEdit(scope.$index, scope.row)">Edit</el-button><el-buttonsize="small"type="danger"@click="handleDelete(scope.$index, scope.row)">Delete</el-button></template></el-table-column></el-table></div></div></template><script>export default {name: 'HomeView',components: {},data() {return {form: {},dialogVisible: false,input: '',tableData: [{date: '2016-05-03',name: 'Tom',address: 'No. 189, Grove St, Los Angeles',},{date: '2016-05-02',name: 'Tom',address: 'No. 189, Grove St, Los Angeles',},{date: '2016-05-04',name: 'Tom',address: 'No. 189, Grove St, Los Angeles',},{date: '2016-05-01',name: 'Tom',address: 'No. 189, Grove St, Los Angeles',}]}},methods: {}}</script>
最终运行结果:
安装 Axios && 创建工具类
使用npm i axios -S进行安装Axios, 这里注意一定要定位到我们的ssm_vue项目.
安装工具类
创建src/utils/request.js文件, 进行封装Axios, 如下:
import axios from "axios"; // 引入 axiosconst request = axios.create({timeout: 5000, // 设置超时时间, 如果发送请求超过五秒没有响应, 就超时.})// 定义 request 拦截器, 在发送请求前, 进行设置 Content-Typerequest.interceptors.request.use(config => {config.headers['Content-Type'] = 'application/json; charset=utf-8'; // 设置请求头return config;}, error => {return Promise.reject(error) // 出现错误就不继续了})export default request // 将组件导出, 其他模块可以进行使用
单机《添加》后调用 save 方法
在我们的HomeView.vue文件中, 有这样一段代码:
<el-button type="primary" @click="save">添加</el-button>那么接下来我们需要定义一个save方法, 使其发送Axios请求:
import request from "@/utils/request" // 引入刚刚创建的 request 模块export default {name: 'HomeView',components: {},data() { ... }, // 其他内容methods: {save() {request.post("http://localhost:8088/SSM/save", this.form). // 发送 this.form 表单数据then(response => { // 发送成功怎么办console.log("response -> " + response);this.dialogVisible = false; // 关闭弹窗});}}}
但是在这里我们会遇到一个跨域问题, 如图:
跨域问题解决
定位到vue.config.js文件, 加入如下代码:
module.exports = {devServer: {port: 10000,proxy: { // 设置代理'/api': { // 设置拦截器, 拦截格式target: 'http://localhost:8088/SSM', // 代理的目标地址changeOrigin: true, // 是否设置同源pathRewrite: { // 路径重写'/api': '' // 选择忽略拦截器里面的单词}}}}}
随后我们在HomeView.vue文件中定义的代码, 改为如下配置:
methods: {save() {request.post("/api/save", this.form). // 这里改成APIthen(response => { // 发送成功怎么办console.log("response -> ", response);this.dialogVisible = false; // 关闭弹窗});}}
修改完毕后, 我们一定要重启Vue, 重启之后我们即可发送请求, 并且MySql中数据可以同步.
我们看一下代理后的情况:
具体可以参考:https://www.jb51.net/javascript/288449bkv.htm (Vue 跨域代码)https://blog.csdn.net/m0_71966801/article/details/133868682 (三种跨域方式)
显示家具
Service 层设计
定义FurnService接口:
public interface FurnService {public void save(Furn furn);public List<Furn> findAll();}
使用FurnServiceImpl进行实现:
@Servicepublic class FurnServiceImpl implements FurnService {@Resource // 自动装配, 因为定义过 MapperScannerprivate FurnMapper furnMapper;@Overridepublic List<Furn> findAll() {return furnMapper.selectByExample(null); // 查询出所有 Furn}// ... 其他代码}
其中Mapper接口中的定义为如下:
<select id="selectByExample" parameterType="com.heihu577.furns.Bean.FurnExample" resultMap="BaseResultMap">select<if test="distinct">distinct</if><include refid="Base_Column_List" />from furn<if test="_parameter != null"><include refid="Example_Where_Clause" /></if><if test="orderByClause != null">order by ${orderByClause}</if></select>
可以从中看到, 其中等同于SELECT * FROM furn, 那么我们进行测试:
public class FurnServiceTest {private ApplicationContext ioc;private FurnService furnService;@Beforepublic void init() {ioc = new ClassPathXmlApplicationContext("applicationContext.xml");furnService = ioc.getBean(FurnService.class);}@Testpublic void testFindAll() {List<Furn> allFurn = furnService.findAll();System.out.println(allFurn);// [com.heihu577.furns.Bean.Furn@53dbe163, com.heihu577.furns.Bean.Furn@db57326, com.heihu577.furns.Bean.Furn@34a875b3, com.heihu577.furns.Bean.Furn@4748a0f9, com.heihu577.furns.Bean.Furn@4b14918a, com.heihu577.furns.Bean.Furn@6d1ef78d, com.heihu577.furns.Bean.Furn@1a6c1270]/*==> Preparing: select id, name, maker, price, sales, stock, img_path from furn==> Parameters:<== Columns: id, name, maker, price, sales, stock, img_path<== Row: 1, 北欧风格小桌子, 熊猫家居, 180.00, 666, 7, assets/images/product-image/6.jpg<== Row: 2, 简约风格小椅子, 熊猫家居, 180.00, 666, 7, assets/images/product-image/4.jpg<== Row: 3, 典雅风格小台灯, 修改家具, 180.00, 666, 7, assets/images/product-image/14.jpg<== Row: 7, 黑客风格牛逼桌, 新增测试家具, 123.00, 120, 88, ./test.jpg<== Row: 8, 111, 123123, 12.00, 2, 99, ./default.jpg<== Row: 9, 123, 123, 123.00, 123, 123, ./default.jpg<== Row: 10, 345, 345, 345.00, 345, 345, ./default.jpg<== Total: 7*/}// ... 其他代码}
Controller 层设计
定义如下代码:
@Controllerpublic class FurnController {@Resourceprivate FurnService furnService;@RequestMapping("/furns")@ResponseBodypublic Msg showFurns() {List<Furn> all = furnService.findAll();Msg success = Msg.success();success.add("furns_list", all); // 将数据放入到 Msg 中return success;}// ... 其他代码}
最终访问http://localhost:8088/SSM/furns返回的数据如下:
{"code":200,"info":"success","map":{"furns_list":[{"id":1,"name":"北欧风格小桌子","maker":"熊猫家居","price":180.00,"sales":666,"stock":7,"imgPath":"assets/images/product-image/6.jpg"},{"id":2,"name":"简约风格小椅子","maker":"熊猫家居","price":180.00,"sales":666,"stock":7,"imgPath":"assets/images/product-image/4.jpg"},{"id":3,"name":"典雅风格小台灯","maker":"修改家具","price":180.00,"sales":666,"stock":7,"imgPath":"assets/images/product-image/14.jpg"},{"id":7,"name":"黑客风格牛逼桌","maker":"新增测试家具","price":123.00,"sales":120,"stock":88,"imgPath":"./test.jpg"},{"id":8,"name":"111","maker":"123123","price":12.00,"sales":2,"stock":99,"imgPath":"./default.jpg"},{"id":9,"name":"123","maker":"123","price":123.00,"sales":123,"stock":123,"imgPath":"./default.jpg"},{"id":10,"name":"345","maker":"345","price":345.00,"sales":345,"stock":345,"imgPath":"./default.jpg"}]}}Vue 界面设计
修改HomeView.vue文件, 将我们的数据放入到Vue表格中.
<el-table :data="tableData" style="width: 100%"> <!-- 列表部分 --><el-table-column prop="id" label="ID号" width="180"/><el-table-column prop="name" label="家具名" width="180"/><el-table-column prop="maker" label="商家"/><el-table-column prop="price" label="价格"/><el-table-column prop="sales" label="销量"/><el-table-column prop="stock" label="库存"/><el-table-column label="Operations"> <!-- 增加一列操作按钮 --><template #default="scope"> <!-- 后面再研究具体含义 --><el-button size="small" @click="handleEdit(scope.$index, scope.row)">Edit</el-button><el-buttonsize="small"type="danger"@click="handleDelete(scope.$index, scope.row)">Delete</el-button></template></el-table-column></el-table>
随后我们顺势修改tableData:
import request from "@/utils/request" // 引入刚刚创建的 request 模块export default {name: 'HomeView',components: {},data() {return {form: {},dialogVisible: false,input: '',tableData: [] // 将这里的数据默认清空.}},methods: {save() {request.post("/api/save", this.form). // 发送 this.form 表单数据then(response => { // 发送成功怎么办console.log("response -> ", response);this.dialogVisible = false; // 关闭弹窗this.list(); // 添加后刷新前端界面});},list() {request.get("/api/furns").then(response => {this.tableData = response['data']['map']['furns_list']; // 将服务器返回的 furns_list, 放给 tableData});}},created() { // Vue 生命周期, 页面加载后, 直接调用 list 方法this.list();}}
最终页面如下:
添加后同步刷新界面
直接在前端中定义好的HomeView.vue::save方法中, 进行刷新即可:
save() {request.post("/api/save", this.form). // 发送 this.form 表单数据then(response => { // 发送成功怎么办console.log("response -> ", response);this.dialogVisible = false; // 关闭弹窗this.list(); // 重新渲染界面, 也就同步上了刷新});},
response 拦截器
在我们的list方法中, 如下:
list() {request.get("/api/furns").then(response => {this.tableData = response['data']['map']['furns_list']; // 将服务器返回的 furns_list, 放给 tableData});}
我们可以增加如下代码, 添加到src/util/request.js文件中:
// response 拦截器, 在调用接口响应后, 统一的处理返回结果request.interceptors.response.use(response => {let res = response.dataif(response.config.responseType == 'blob'){return res; // 结果是文件, 直接返回}if(typeof res === 'string'){ // 如果是 string, 就转换成 json 对象res = res ? JSON.parse(res) : res;// 如果 res 不为 null, 就进行转换}return res}, error => {console.log("error", error)return Promise.reject(error);})
这样的话我们可以将list方法修改为如下:
list() {request.get("/api/furns").then(response => {this.tableData = response['map']['furns_list']; // 将服务器返回的 furns_list, 放给 tableData});}
修改家具

Service 层设计
老套路, FurnService接口增加如下方法声明:
public void updateByPrimaryKey(Furn furn);随后使用FurnServiceImpl进行实现:
@Overridepublic void updateByPrimaryKey(Furn furn) {furnMapper.updateByPrimaryKeySelective(furn);}
最终运行结果:
@Testpublic void testUpdate() {Furn furn = new Furn();furn.setId(8);furn.setName("大象桌子你别管");furn.setMaker("大象桌子");furnService.updateByPrimaryKey(furn);/** JDBC Connection [com.mysql.cj.jdbc.ConnectionImpl@2f16c6b3] will be managed by Spring==> Preparing: update furn SET name = ?, maker = ?, img_path = ? where id = ?==> Parameters: 大象桌子你别管(String), 大象桌子(String), ./default.jpg(String), 8(Integer)<== Updates: 1* */// 可以看到 SQL 语句中也修改了 img_path 字段, 这是因为我们的 JavaBean 中定义了默认的 img_Path 的值, 若不想修改, 我们可以直接使用 furn.setImgPath(null); 即可.}
Controller 层设计
在FurnController类中定义如下方法:
@PutMapping("/update")@ResponseBodypublic Msg update(@RequestBody Furn furn) {furnService.updateByPrimaryKey(furn);Msg success = Msg.success();return success;}
随后我们发送如下HTTP请求, 即可得到返回结果:
PUT /SSM/update HTTP/1.1Host: localhost:8088Content-Type: application/jsonContent-Length: 29{"id":1,"price":"200.00"}
最终可以得到如下结果:
{"code":200,"info":"success","map":{}}Vue 界面设计
接下来我们要对前端每行最后的编辑功能进行功能实现, 如图:
<el-table-column label="Operations"> <!-- 增加一列操作按钮 --><template #default="scope"> <!-- 确定当前行的变量名 --><el-button size="small" @click="handleEdit(scope.$index, scope.row)"> <!-- 把当前行的记录传入过去 --><!--scope.$index: 当前行的索引号例如: 0scope.row: 当前行数据例如:Proxy { <target>: {…}, <handler>: {…} }<target>: Object { id: 1, name: "北欧风格小桌子", maker: "熊猫家居", … }<handler>: Object { _isReadonly: false, _isShallow: false }-->Edit</el-button><el-button size="small" type="danger" @click="handleDelete(scope.$index, scope.row)">Delete</el-button></template></el-table-column>
定义handleEdit方法, 放入到Vue对象的methods属性中:
handleEdit(index, row) {let obj = (JSON.parse(JSON.stringify(row))) // 将代理对象 -> 转化为 JSON 串 -> JSON 解析为真正的对象// Object { id: 1, name: "北欧风格小桌子", maker: "熊猫家居", price: 200, sales: 666, stock: 7, imgPath: "./default.jpg" }this.form = obj; // 将过来的数据信息, 继续填充到 form 表单中this.dialogVisible = true; // 弹出对话框},
只不过这样导致的问题就是, 修改|增加用的都是同一个对话框, 那么接下来我们使用v-if进行判断这两种情况:
<el-form-item><!-- 判断ID是否在form中, 如果是修改, 肯定有id属性, 如果是新增, 肯定没有id属性 --><el-button v-if="!('id' in form)" type="primary" @click="save">添加</el-button><el-button v-if="'id' in form" type="primary" @click="edit">修改</el-button><el-button @click="dialogVisible = false">取消</el-button> <!-- 单机后关闭弹窗 --></el-form-item>
最终新增与修改显示如下:
edit方法:
edit() {request.put("/api/update", this.form).then(response => {this.dialogVisible = false; // 关闭弹窗if (response['code'] === 200) { // 修改成功, 后台 Java 也返回了状态码为 200 的状态ElMessage({message: '修改数据成功',type: 'success',})this.list(); // 重新渲染界面} else {ElMessage({message: '修改数据失败',type: 'error',})}});}
最后创建成功即可. 这一部分代码可以观察官方文档http://element-plus.org/zh-CN/component/message.html
这里要注意的是, this.list();进行重新渲染页面时, 一定要放在request.XXX请求方法内, 否则会因为数据不同步而导致异步问题.
删除家具
定义Service接口:
public void deleteByPrimaryKey(int id);在FurnServiceImpl中进行实现:
@Overridepublic void deleteByPrimaryKey(int id) {furnMapper.deleteByPrimaryKey(id);}
随后在FurnController中定义方法, 具体实现如下:
confirmEvent(row) {let obj = (JSON.parse(JSON.stringify(row))) // 将代理对象 -> 转化为 JSON 串 -> JSON 解析为真正的对象request.delete("/api/delete/" + obj['id']).then(response => {this.list();})}
根据官方文档:http://element-plus.org/zh-CN/component/popconfirm.html, 做出对应的前端界面:
<el-popconfirmconfirm-button-text="Yes"cancel-button-text="No":icon="InfoFilled"icon-color="#626AEF"title="你确定要删除吗?"@confirm="confirmEvent(scope.row)"@cancel="cancelEvent"><!-- confirmEvent方法确认, cancelEvent方法用于取消 --><template #reference><el-button size="small">Delete</el-button></template></el-popconfirm>
注意, 这个要放在<template #default="scope">标签内. 定义confirmEvent方法内容如下:
confirmEvent(row) {let obj = (JSON.parse(JSON.stringify(row))) // 将代理对象 -> 转化为 JSON 串 -> JSON 解析为真正的对象request.delete("/api/delete/" + obj['id']).then(response => {ElMessage({ // 弹出 删除成功提示框message: '删除成功!',type: 'success',})this.list();})}
最终运行结果:
实现分页
思路分析
-
后台使用 MyBatis PageHelper插件完成分页查询 -
修改 FurnController, 增加处理分页显示代码 -
完成前台代码, 加入分页导航, 并将分页请求和后台接口结合
配置分页功能到 mybatis-config.xml
进入到src/resources/mybatis-config.xml文件中, 增加如下配置项:
<plugins><plugin interceptor="com.github.pagehelper.PageInterceptor"><!--配置分页合理化1. 如果用户请求的 pageNum > pages, 就显示查询最后一页2. 如果用户请求的 pageNum < 0, 就显示第一页--><property name="reasonable" value="true"/></plugin></plugins>
Controller 层设计
直接在FurnController中增加如下方法:
/*** listFurnsByPage 根据当前页返回数据* @param pageNum: 当前页面* @param pageSize: 每页大小* @return Msg*/@ResponseBody@RequestMapping("/furnsByPage")public Msg listFurnsByPage(@RequestParam(defaultValue = "1") Integer pageNum,@RequestParam(defaultValue = "5") Integer pageSize) {// 如果没有传入 pageNum, 给默认值 1, 如果没有传入 pageSize, 给默认值 5PageHelper.startPage(pageNum, pageSize); // 设置分页参数List<Furn> furnList = furnService.findAll();// 调用 findAll 是查询所有结果, 底层会进行物理分页, 会根据分页参数来计算 limit ?,? 而且在发出 SQL 语句时, 会带上 limitPageInfo<Furn> pageInfo = new PageInfo<>(furnList); // pageInfo 对象包含了分页的各个信息return Msg.success().add("pageInfo", pageInfo);}
访问furnsByPage?pageNum=2&pageSize=2结果:
{"code":200,"info":"success","map":{"pageInfo":{"total":8,"list":[{"id":7,"name":"黑客风格牛逼桌","maker":"新增测试家具","price":123.00,"sales":120,"stock":88,"imgPath":"./test.jpg"},{"id":8,"name":"大象桌子你别管","maker":"大象桌子","price":12.00,"sales":5,"stock":99,"imgPath":"./default.jpg"}],"pageNum":2,"pageSize":2,"size":2,"startRow":3,"endRow":4,"pages":4,"prePage":1,"nextPage":3,"isFirstPage":false,"isLastPage":false,"hasPreviousPage":true,"hasNextPage":true,"navigatePages":8,"navigatepageNums":[1,2,3,4],"navigateFirstPage":1,"navigateLastPage":4}}}成功查询出第2页, 大小为2的记录.
前端界面设计
首页分页 - 默认第一页

HomeView.vue文件中:
<el-paginationv-model:current-page="currentPage4" 当前界面绑定变量v-model:page-size="pageSize4" 当前大小绑定界面:page-sizes="[100, 200, 300, 400]" 这里是生成 100, 200, 300, 400 的下拉框:small="small" 变小:disabled="disabled":background="background"layout="total, sizes, prev, pager, next, jumper" 控件:total="400" 页面总条数, 后面使用变量进行存储@size-change="handleSizeChange" 100条/页 等变化时, 会触发该方法@current-change="handleCurrentChange" 点击导航中某一页会触发该方法/>
最终界面显示如下:
// ...其他代码data() {return {currentPage4: 1, // 当前第几页pageSize4: 2, // 每页多少记录total: 20, // 总共页数background: true, // 添加背景色}}// ...其他代码
而因为最初的设计, list方法会返回所有的数据库条数, 所以在这里我们可以修改list方法, 修改为如下:
list() {request.get("/api/furnsByPage?pageNum=" + this.currentPage4 + "&pageSize=" + this.pageSize4).then(response => {this.total = response['map']['pageInfo']['total']; // 将服务器返回来的数据库总条数得到this.tableData = response['map']['pageInfo']['list']; // 将服务器返回来的已经分页好的数据得到});},
修改栏目分页
当我们想跳转到第2, 3, 4页时, 我们需要动态展示数据, 在前面我们知道, 我们el-pagination标签中存在@current-change="handleCurrentChange"属性, 下面我们在Vue对象的methods属性中实现这个方法.
handleCurrentChange(pageNum) { // 传递过来的 pageNum 是当前页面信息this.currentPage4 = pageNum; // 修改当前页面变量this.list(); // 重新渲染}
当然, 我们每页需要展示多少数据, 是通过@size-change="handleSizeChange"指定的, 那么实现该方法:
handleSizeChange(pageSize) { // 默认传入进来 pageSizethis.total = pageSize;this.list(); // 重新渲染}
带条件查询分页显示列表
完成 Service
在FurnService接口中定义如下注解:
public List<Furn> findFurnByExample(String name);在FurnServiceImpl中对其进行实现:
/*** @param name 根据传入的用户名称进行模糊查询* @return*/@Overridepublic List<Furn> findFurnByExample(String name) {FurnExample furnExample = new FurnExample();FurnExample.Criteria criteria = furnExample.createCriteria(); // 创建条件if (StringUtils.hasText(name)) { // name 不为空criteria.andNameLike("%" + name + "%"); // 使用 LIKE 条件}return furnMapper.selectByExample(furnExample);}
随后我们对其进行测试:
@Testpublic void testFindFurnByExample() {ApplicationContext ioc = new ClassPathXmlApplicationContext("applicationContext.xml");FurnService furnService = ioc.getBean(FurnService.class);List<Furn> furns = furnService.findFurnByExample("风格");for (Furn furn : furns) {System.out.println(furn);/*com.heihu577.furns.Bean.Furn@2d96543ccom.heihu577.furns.Bean.Furn@73a2e526com.heihu577.furns.Bean.Furn@7d64e326*/}/*==> Preparing: select id, name, maker, price, sales, stock, img_path from furn WHERE ( name like ? )==> Parameters: %风格%(String)<== Columns: id, name, maker, price, sales, stock, img_path<== Row: 2, 简约风格小椅子, 熊猫家居, 180.00, 666, 7, assets/images/product-image/4.jpg<== Row: 3, 典雅风格小台灯, 修改家具, 180.00, 666, 7, assets/images/product-image/14.jpg<== Row: 7, 黑客风格牛逼桌, 新增测试家具, 123.00, 120, 88, ./test.jpg<== Total: 3*/}
完成 Controller
在FurnController中定义方法如下:
/*** 根据查询内容返回对应的 List<Furn>* @param pageNum 当前第几页* @param pageSize 每页大小* @param name 模糊查询的字符* @return*/@ResponseBody@RequestMapping("/furnsByConditionPage")public Msg listFurnsByConditionPage(@RequestParam(defaultValue = "1") Integer pageNum,@RequestParam(defaultValue = "5") Integer pageSize,@RequestParam(defaultValue = "") String name) {// 如果没有传入 pageNum, 给默认值 1, 如果没有传入 pageSize, 给默认值 5PageHelper.startPage(pageNum, pageSize); // 设置分页参数// List<Furn> furnList = furnService.findAll(); 这里就不使用 findAll 了, findAll 是所有数据List<Furn> furnByExample = furnService.findFurnByExample(name);PageInfo<Furn> pageInfo = new PageInfo<>(furnByExample); // pageInfo 对象包含了分页的各个信息return Msg.success().add("pageInfo", pageInfo);}
通过访问http://localhost:8088/SSM/furnsByConditionPage?pageNum=1&pageSize=5&name=风格会得到如下结果:
{"code":200,"info":"success","map":{"pageInfo":{"total":3,"list":[{"id":2,"name":"简约风格小椅子","maker":"熊猫家居","price":180.00,"sales":666,"stock":7,"imgPath":"assets/images/product-image/4.jpg"},{"id":3,"name":"典雅风格小台灯","maker":"修改家具","price":180.00,"sales":666,"stock":7,"imgPath":"assets/images/product-image/14.jpg"},{"id":7,"name":"黑客风格牛逼桌","maker":"新增测试家具","price":123.00,"sales":120,"stock":88,"imgPath":"./test.jpg"}],"pageNum":1,"pageSize":5,"size":3,"startRow":1,"endRow":3,"pages":1,"prePage":0,"nextPage":0,"isFirstPage":true,"isLastPage":true,"hasPreviousPage":false,"hasNextPage":false,"navigatePages":8,"navigatepageNums":[1],"navigateFirstPage":1,"navigateLastPage":1}}}Vue 界面设计
当我们单机搜索按钮时, 我们将事件绑定到list方法, 如下代码:
<div style="margin: 10px 5px;"> <!-- 搜索部分 --><el-input v-model="input" style="width: 280px" placeholder="Please input"/> <!-- 输入框 --><el-button @click="list">搜索</el-button> <!-- 按钮 --></div>
这里注意, 搜索框的值与input变量进行绑定了, 重新定义list方法定义如下:
list() {// request.get("/api/furnsByPage?pageNum=" + this.currentPage4 + "&pageSize=" + this.pageSize4).then(response => {// this.total = response['map']['pageInfo']['total'];// this.tableData = response['map']['pageInfo']['list']; // 将服务器返回的 furns_list, 放给 tableData// }); 这种方式不需要了, 使用下面的方式request.get("/api/furnsByConditionPage", {params: { // 使用参数的方式进行传递pageNum: this.currentPage4,pageSize: this.pageSize4,name: this.input}}).then(response => {this.total = response['map']['pageInfo']['total'];this.tableData = response['map']['pageInfo']['list']; // 将服务器返回的 furns_list, 放给 tableData});},
添加家具
前端校验
我们前端添加内容时, 并没有进行数据校验, 在这里我们需要进行一个前端校验. 在我们的HomeView.vue文件中, 在data()域中增加rules规则:
rules: {/*<el-input v-model="form.name"/> <!-- 要与 JavaBean 保持一致, 对象的属性可以动态生成 --><el-input v-model="form.maker"/><el-input v-model="form.price"/><el-input v-model="form.sales"/><el-input v-model="form.stock"/>* */name: [{required: true, message: '请输入家具名', trigger: 'blur'} // 对应上第一个 el-input],maker: [{required: true, message: '请输入制造商名', trigger: 'blur'}],price: [{required: true, message: '请输入价格', trigger: 'blur'},{pattern: /^([1-9]|0d*|0)+?(.d+)*$/, message: '请输入数字', trigger: 'blur'}],sales: [{required: true, message: '请输入销量', trigger: 'blur'},],stock: [{required: true, message: '请输入库存', trigger: 'blur'},{pattern: /^[1-9]+?d*?$/, message: '请输入数字', trigger: 'blur'}]}}
定义好规则之后, 我们在form表单中进行指定规则:
<el-form :model="form" :rules="rules" ref="form" label-width="auto" style="max-width: 600px"> <!-- 增加校验规则使用 :rules进行指明 --><el-form-item label="家具名" prop="name"> <!-- 增加校验规则第二点, 使用 prop 进行绑定 rules 中的 key --><el-input v-model="form.name"/> <!-- 要与 JavaBean 保持一致, 对象的属性可以动态生成 --></el-form-item><!-- ... 其他基本一致 --></el-form>
此时只生效了弹框, 但并不阻止用户提交表单 (因为用户提交表单绑定的是事件方法), 如图:
save方法中进行增加校验规则:
save() {this.$refs['form'].validate((valid) => {if(valid){ // 如果验证通过request.post("/api/save", this.form). // 发送 this.form 表单数据then(response => { // 发送成功怎么办console.log("response -> ", response);this.dialogVisible = false; // 关闭弹窗this.list(); // 重新渲染界面}); // 才发请求}else{// 校验失败... 这里可以弹出提示框等操作}})},
但是由于弹出错误信息后, 直接关闭新增对话框, 第二次单机新增按钮, 还保留了上次的错误信息, 下面我们看一下如何解决:
<el-button type="primary" plain @click="add();">新增</el-button>// ... 其他代码add(){this.dialogVisible = true;this.form = {};if("form" in this.$refs){ // 如果没有初始化 form 可能会报错, 所以这里增加一个校验规则.this.$refs['form'].resetFields();}},
将本来的@click="xxxx"修改为了调用add方法.
后端校验
如果没有后端校验, 那么可以通过BurpSuite | PostMan进行绕过, 从而发送请求. 下面是我们要完成的功能.
我们对我们的Furn类进行添加一些验证注解:
public class Furn {private Integer id;@NotEmpty(message = "请输入家具名")private String name;@NotEmpty(message = "请输入家具商") // NotEmpty 修饰 List, 字符串, Mapprivate String maker;@NotNull(message = "请输入价格")@Range(min = 0, message = "价格不能小于0") // 不能小于0private BigDecimal price;@NotNull(message = "请输入销量")@Range(min = 0, message = "销量不能小于0")private Integer sales;@NotNull(message = "请输入库存")@Range(min = 0, message = "库存不能小于0")private Integer stock;private String imgPath = "./default.jpg";}
随后定义FurnController, 内容如下:
@PostMapping("/save")@ResponseBody // 返回 JSON 数据public Msg save(@Validated @RequestBody Furn furn, Errors errors) { // 接收 JSON 数据, 注意这里需要加 @Validated 注解if (errors.hasErrors()) { // 存在错误信息, 返回错误信息Map<String, String> map = new ConcurrentHashMap<>();List<FieldError> fieldErrors = errors.getFieldErrors();for (FieldError fieldError : fieldErrors) {map.put(fieldError.getField(), fieldError.getDefaultMessage());}return Msg.fail().add("errors", map);} else {// 增加成功界面, 不存在错误信息, 直接保存furnService.save(furn);Msg success = Msg.success();return success;}}
发送Http请求如下:
POST /SSM/save HTTP/1.1Host: localhost:8088Content-Type: application/jsonContent-Length: 19{"name":"zhangsan"}
最终运行结果:
HTTP/1.1 200Content-Type: application/json;charset=UTF-8Date: Sun, 12 May 2024 02:43:47 GMTContent-Length: 152{"code":400,"info":"fail","map":{"errors":{"price":"请输入价格","maker":"请输入家具商","stock":"请输入库存","sales":"请输入销量"}}}
可以从中看到, 后端校验已成功.
前后端链接
刚刚前端进行了错误校验, 后端也进行了错误校验, 我们想要将后端的错误信息数据也显示到前端中, 我们首先定义一个用于保存错误信息的对象在数据池中:
data() {return {serverReturnErrors: {}, // 服务器返回来的错误信息// ... 其他代码}}
随后在我们save方法发送请求中, 进行判断返回来的结果:
save() {this.$refs['form'].validate((valid) => {if (valid) { // 如果验证通过request.post("/api/save", this.form). // 发送 this.form 表单数据then(response => { // 发送成功怎么办console.log("response -> ", response);if (response['code'] === 200) { // 正确情况this.dialogVisible = false; // 关闭弹窗this.list(); // 重新渲染界面} else { // 出现异常this.serverReturnErrors.name = response['map']['errors']['name']this.serverReturnErrors.price = response['map']['errors']['price']this.serverReturnErrors.maker = response['map']['errors']['maker']this.serverReturnErrors.stock = response['map']['errors']['stock']this.serverReturnErrors.sales = response['map']['errors']['sales']}}); // 才发请求} else {}})},
随后将错误信息展示:
<el-form-item label="家具名" prop="name"> <!-- 增加校验规则第二点, 使用 prop 进行绑定 rules 中的 key --><el-input v-model="form.name"/> <!-- 要与 JavaBean 保持一致, 对象的属性可以动态生成 -->{{serverReturnErrors.name}}</el-form-item> <!-- 其他标签以此类推... -->
然后我们为了测试数据, 将vue验证中的valid定义为true, 随后进行测试:
这里还有清空后台校验的信息, 就不做代码演示了.
原文始发于微信公众号(Heihu Share):开发基础 | SSM 整合 + VUE && CRUD
- 左青龙
- 微信扫一扫
-

- 右白虎
- 微信扫一扫
-


评论